
Learning how to clean an electric skillet properly helps remove grease, burnt food, sticky residue, and unpleasant odours without damaging the cooking surface or electrical components.
An electric skillet also called an electric frying pan or electric frypan in the UK and Australia needs more care than a standard stovetop pan. Some models can be immersed in water after the temperature probe is removed, while others have a non-removable heating base that must stay dry.
The safest rule is simple: unplug the appliance, let it cool, remove the temperature control, and check the manufacturer’s instructions before putting any part in water or a dishwasher. Different models have different cleaning requirements.
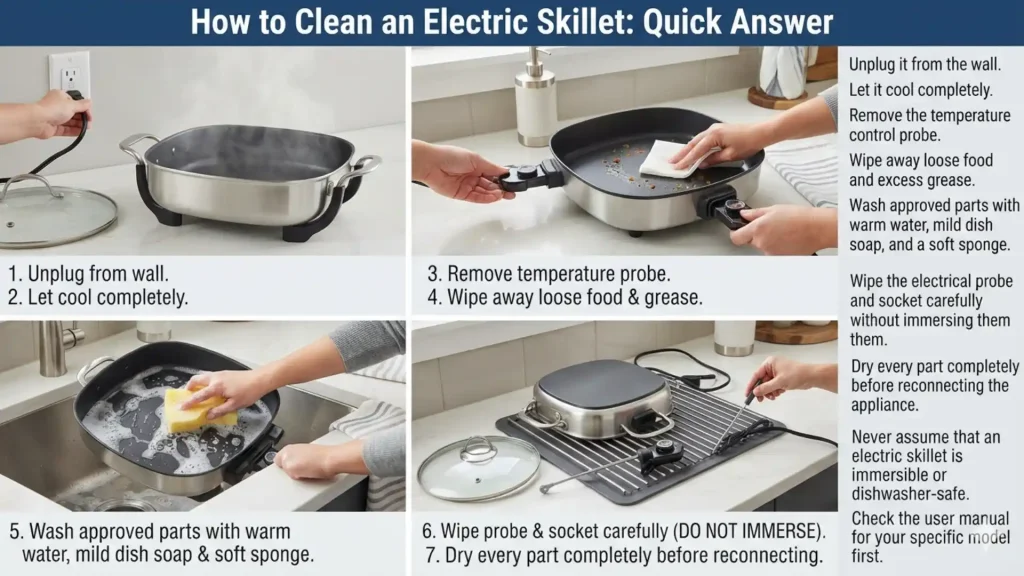
How to Clean an Electric Skillet: Quick Answer
To clean an electric skillet safely:
- Unplug it from the wall.
- Let it cool completely.
- Remove the temperature control probe.
- Wipe away loose food and excess grease.
- Wash approved parts with warm water, mild dish soap, and a soft sponge.
- Wipe the electrical probe and socket carefully without immersing them.
- Dry every part completely before reconnecting the appliance.
Never assume that an electric skillet is immersible or dishwasher-safe. Check the user manual for your specific model first.
What You Need to Clean an Electric Skillet
Most electric skillets can be cleaned with simple household supplies.
Gather the following items:
- Mild dish soap or washing-up liquid
- Warm water
- A soft sponge
- A microfibre cloth
- Paper towels
- A non-abrasive nylon brush
- A silicone or plastic scraper
- Baking soda
- White vinegar, if approved for the surface
- A clean, dry kitchen towel
- Cotton swabs for narrow, non-electrical areas
Cleaning Tools and Products to Avoid
Do not use anything that may scratch the cooking surface or damage the electrical components.
Avoid:
- Steel wool
- Metal scouring pads
- Metal scrapers
- Sharp knives
- Abrasive cleaning powders
- Oven cleaner
- Chlorine bleach
- Harsh degreasers
- Undiluted chemicals
- Direct water spray near the electrical socket
Electric skillet manuals commonly recommend a soft cloth, sponge, or nylon cleaning tool and warn against metal pads and abrasive cleaners on nonstick surfaces.
Important Safety Steps Before Cleaning
Cleaning an electric skillet safely begins before water or soap touches the appliance.
Unplug the Skillet
Turn the temperature control to the off position, then unplug the power cord from the wall outlet.
Do not clean the skillet while it is connected to electricity, even when the temperature dial is turned off.
Let It Cool Completely
Wait until the cooking surface, lid, handles, and heating area are cool enough to touch comfortably.
Adding cold water to a hot pan may cause sudden temperature changes that can stress or warp some cookware materials. It can also create hot steam and increase the risk of burns. Cookware manufacturers generally advise allowing pans to cool before washing.
Remove the Temperature Control Probe
If your skillet has a detachable temperature probe, remove it before washing the skillet.
The control probe contains electrical components and should not be submerged or put in a dishwasher. Depending on the manufacturer’s instructions, it may be wiped with a dry or slightly damp soft cloth. It must be completely dry before being
How to Clean an Electric Skillet After Every Use
Regular cleaning is easier and safer than waiting for layers of grease and burnt food to accumulate.
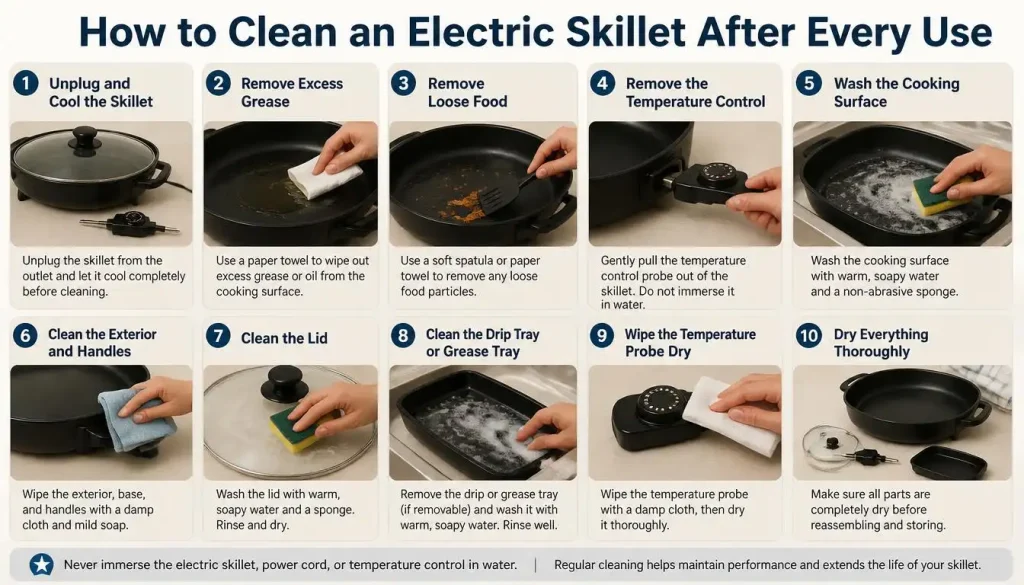
Step 1: Unplug and Cool the Skillet
Unplug the appliance and let it cool completely.
Do not try to speed up cooling by pouring cold water into a hot skillet.
Step 2: Remove Excess Grease
Once the grease is cool enough to handle but has not fully hardened, pour or scrape it into a suitable disposable container.
You can also absorb small amounts with paper towels.
Do not pour bacon fat, cooking oil, or melted animal fat down the sink. It can cool and harden inside household plumbing.
Step 3: Remove Loose Food
Use a paper towel, silicone spatula, or plastic scraper to remove crumbs and loose food particles.
Do not use a knife or metal utensil to scrape a nonstick surface.
Step 4: Remove the Temperature Control
Detach the temperature control probe and set it aside in a dry location.
Inspect the probe, power cord, and plug for:
- Cracks
- Frayed wires
- Melted areas
- Burn marks
- Loose connections
- Corrosion
Do not use the appliance if any electrical component appears damaged.
Step 5: Wash the Cooking Surface
For an approved washable or immersible skillet:
- Add warm water and a small amount of mild dish soap.
- Wash the interior with a soft sponge.
- Clean the corners and sides gently.
- Rinse away the soap.
- Dry the skillet thoroughly.
For a non-immersible model, dip the sponge into warm soapy water and squeeze out the excess before wiping the cooking surface.
Step 6: Clean the Exterior and Handles
Wipe the outer walls, handles, and legs with a damp cloth.
Grease often collects:
- Under the handles
- Around the lid rim
- Near the control socket
- Along the outside edge of the cooking pan
Use a soft nylon brush for narrow crevices, but do not push water or soap into the electrical socket.
Step 7: Clean the Lid
Most removable glass lids can be washed with warm water and dish soap.
Pay attention to:
- The underside of the lid
- The metal rim
- The handle attachment
- The steam vent
- Areas where condensation and grease collect
Allow a hot glass lid to cool before washing it. A sudden temperature change may damage the glass.
Step 8: Clean the Drip Tray or Grease Tray
If your skillet has a removable drip tray:
- Remove it after the appliance has cooled.
- Pour the grease into a suitable container.
- Wash the tray with warm soapy water.
- Rinse and dry it.
- Reinstall it only after it is completely dry.
Step 9: Wipe the Temperature Probe
Use a dry, soft cloth or a slightly damp cloth if the manufacturer permits it.
Never place the probe in water. Never put it in a dishwasher.
Step 10: Dry Everything Thoroughly
Pay special attention to:
- The electrical socket
- Connector pins
- Probe insertion area
- Underside of the skillet
- Lid rim
- Handle joints
Do not reconnect the temperature control until the skillet and connection area are completely dry. Electric frypan manuals specifically warn that the probe insertion area and prongs must be dry before use.
Choose the Right Cleaning Method for Your Skillet
The correct method depends on how the appliance is constructed.
How to Clean a Non-Immersible Electric Skillet
A non-immersible skillet usually has a heating base or electrical components that cannot be separated from the pan.
To clean it:
- Unplug and cool the skillet.
- Remove the detachable temperature probe, if present.
- Wipe out loose food and grease.
- Use a damp, soapy sponge to clean the interior.
- Wipe again with a clean damp cloth to remove soap.
- Clean the exterior without spraying it directly.
- Dry the skillet completely.
Do not place the appliance in a sink, dishwasher, or container of water.
How to Clean an Immersible Electric Skillet
Only follow this method when the manufacturer clearly states that the skillet body is immersible.
- Unplug the appliance.
- Let it cool.
- Remove the temperature probe.
- Check that the socket area is undamaged.
- Wash the approved skillet body in warm soapy water.
- Rinse it carefully.
- Drain water away from the socket.
- Dry the skillet and socket completely.
The temperature probe must remain dry.
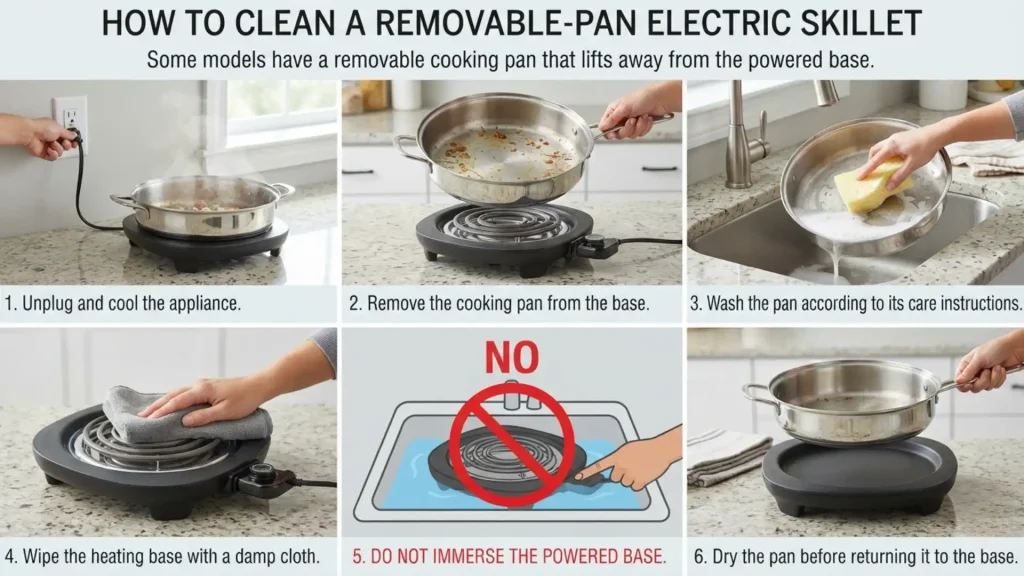
How to Clean a Removable-Pan Electric Skillet
Some models have a removable cooking pan that lifts away from the powered base.
For these models:
- Unplug and cool the appliance.
- Remove the cooking pan from the base.
- Wash the pan according to its care instructions.
- Wipe the heating base with a damp cloth.
- Do not immerse the powered base.
- Dry the pan before returning it to the base.
How to Clean a Dishwasher-Safe Electric Skillet
Put an electric skillet in the dishwasher only when its manual or product care guide specifically says it is dishwasher-safe.
Before loading it:
- Remove the temperature probe.
- Remove the power cord if detachable.
- Position the skillet so water can drain.
- Keep the electrical probe out of the dishwasher.
- Check whether the lid is also dishwasher-safe.
Even when dishwasher cleaning is permitted, manufacturers may recommend hand-washing to help preserve the finish and nonstick performance.
How to Clean an Electric Skillet Before First Use
A new electric skillet may contain packaging dust, manufacturing residue, or adhesive from labels.
Before using it for the first time:
- Remove all packaging, stickers, and protective materials.
- Read the complete instruction manual.
- Remove the temperature control probe.
- Wash the approved skillet body and lid with warm soapy water.
- Wipe non-washable bases with a damp cloth.
- Rinse washable parts.
- Dry every part thoroughly.
- Reassemble the skillet only when it is completely dry.
Some manufacturer manuals specifically direct users to wash the skillet and glass lid before first use while keeping the temperature probe separate and dry.
Do not season the cooking surface with oil unless the manufacturer recommends it. Many modern nonstick and ceramic skillets do not require traditional seasoning.
How to Deep Clean an Electric Skillet
A normal wash may not remove burnt food, sticky grease, old cooking-spray residue, stains, or lingering smells. Use a gentle deep-cleaning method rather than aggressive scrubbing.
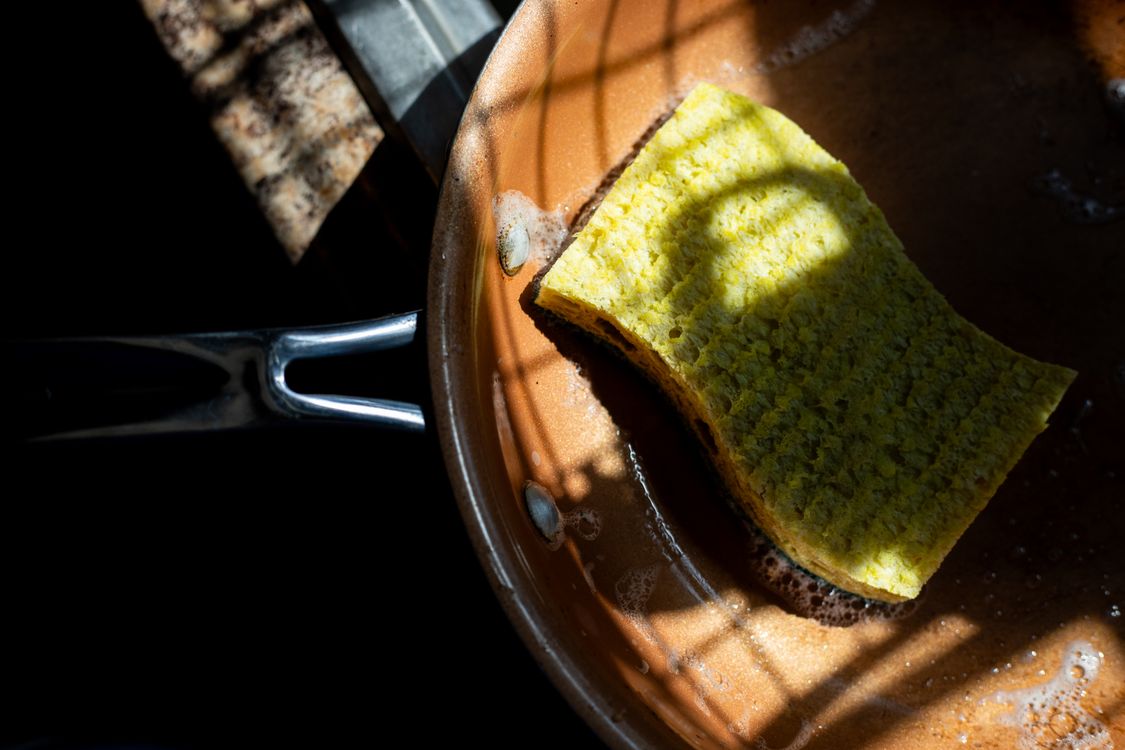
Image credit: Meaghan via Pexels. Free to use under the Pexels licence.
How to Remove Burnt Food From an Electric Skillet
Start with the gentlest method.
Method 1: Warm Soapy Water
- Unplug and cool the skillet.
- Remove the temperature probe.
- Add enough warm water to cover the burnt area.
- Add a few drops of mild dish soap.
- Let it sit for 10–20 minutes.
- Loosen the residue with a silicone or plastic scraper.
- Wash with a soft sponge.
- Rinse and dry.
Do not soak a non-immersible appliance. Add only enough water to treat the cooking surface while keeping the socket dry.
Method 2: Baking Soda Paste
For stubborn spots:
- Mix baking soda with a few drops of water.
- Create a thick paste.
- Apply it to the burnt area.
- Leave it for approximately 15–30 minutes.
- Wipe gently with a soft, non-abrasive sponge.
- Rinse thoroughly.
- Dry completely.
Baking soda can help lift residue, but aggressive scrubbing may still dull or scratch a delicate coating. Manufacturer guidance for nonstick cookware recommends applying the paste gently and wiping with a non-abrasive cloth or sponge.
Method 3: Diluted Vinegar
A diluted vinegar solution may help loosen stubborn residue on compatible surfaces.
Mix equal amounts of white vinegar and water, then apply a small amount to the affected area. Let it sit briefly before wiping gently.
Do not pour vinegar into electrical openings. Do not heat the cleaning solution in the skillet unless the appliance manual specifically permits that method. GreenPan’s electric skillet guidance recommends a diluted vinegar solution for stubborn residue while emphasising complete drying before reassembly.
How to Remove Sticky Grease and Cooking-Spray Residue
A sticky surface may be caused by:
- Old cooking oil
- Overheated grease
- Incomplete rinsing
- Aerosol cooking spray
- Food residue left around the pan’s edges
- Repeated cooking at excessively high temperatures
To remove the sticky film:
- Wash the surface with warm water and mild soap.
- Let the soapy water remain on the affected area for several minutes.
- Wipe with a soft sponge.
- Apply a gentle baking soda paste if residue remains.
- Rinse carefully.
- Repeat the process instead of scrubbing harder.
- Dry the skillet completely.
Avoid using aerosol cooking spray on a nonstick electric skillet unless the manufacturer approves it. Spray oils can burn and create residue or carbonised buildup that affects the surface’s release performance.
Use a small amount of liquid cooking oil or butter instead when permitted by the product instructions.
How to Clean an Electric Skillet After Cooking Bacon
Bacon leaves behind liquid fat, cooked protein, and sticky brown residue.
For easier cleanup:
- Allow the skillet to cool until the grease is safe to handle.
- Pour the grease into a heat-safe container.
- Wipe the remaining fat with paper towels.
- Add warm soapy water.
- Allow stubborn spots to soften.
- Clean with a soft sponge.
- Wash the grease tray separately.
- Dry the skillet fully.
Do not let a deep layer of bacon grease harden inside the skillet.
How to Remove Stains and Discolouration
Not every mark is burnt food. You may notice:
- Dark marks over the heating element
- White mineral spots
- Soap residue
- Brown oil stains
- Dishwasher discolouration
- Exterior staining
For white spots, wipe with a diluted vinegar solution if the surface manufacturer allows it.
For brown oil stains, use warm soapy water followed by a gentle baking soda treatment.
Some discolouration may be cosmetic and may not affect cooking. However, peeling, bubbling, or flaking coating is damage not a stain and should not be scrubbed or ignored.
How to Remove Odours From an Electric Skillet
Lingering smells usually come from grease or food trapped in hidden areas.
Clean:
- The lid rim
- Steam vent
- Handle joints
- Corners of the pan
- Grease tray
- Exterior edges
After cleaning, leave the lid off until the skillet is completely dry. This allows trapped moisture and odours to escape.
For persistent food smells, wipe the compatible cooking surface with diluted vinegar, rinse it, and dry it carefully.
How to Clean the Temperature Probe and Electrical Socket
The temperature control requires a different cleaning method from the pan.
Cleaning the Temperature Probe
- Make sure it is unplugged.
- Wipe it with a dry soft cloth.
- If the manual permits, use a barely damp cloth for grease.
- Wipe it dry immediately.
- Inspect the metal contacts before use.
Never immerse the probe or place it in a dishwasher.
Cleaning the Connector Socket
Use a dry cloth or dry cotton swab to remove visible crumbs from around the socket.
Do not:
- Pour water into the socket
- Spray cleaner into it
- Insert a metal cleaning tool
- Scrub the electrical pins with metal wool
- Reconnect the probe while the area is damp
Some manuals specifically warn against using metal pads on the electrical pins and instruct users to dry the socket and pins thoroughly after washing.
What to Do If the Electric Skillet Socket Gets Wet
If water enters the connector area:
- Keep the skillet unplugged.
- Remove the temperature control.
- Drain visible water away from the socket.
- Wipe the exterior with a dry cloth.
- Place the appliance in a well-ventilated area.
- Do not reconnect it until the socket is completely dry.
- Check the manual for model-specific instructions.
Do not use a hair dryer, oven, microwave, or direct flame to dry the appliance.
If water may have entered a sealed electrical housing, or you notice corrosion, sparks, burning smells, or erratic temperature control, contact the manufacturer or a qualified appliance technician before using it again.
How to Clean Different Electric Skillet Surfaces
Always identify the cooking-surface material before applying a stain-removal product.
Nonstick Electric Skillet
Use:
- Mild dish soap
- Warm water
- Soft sponge
- Microfibre cloth
- Silicone or plastic scraper
Avoid:
- Steel wool
- Abrasive powder
- Metal utensils
- Harsh degreasers
- Aggressive scrubbing
Ceramic Electric Skillet
Ceramic coatings can lose performance when covered with burnt oil or cooking-spray residue.
Use low-pressure cleaning with warm soapy water. Treat stubborn spots with a gentle baking soda paste and a soft cloth.
Stainless-Steel Electric Skillet
A stainless-steel removable pan may tolerate firmer cleaning than a coated pan, but always check whether the surface has a nonstick layer.
For uncoated stainless steel:
- Let it cool completely.
- Use warm water and mild dish soap.
- Clean with a soft sponge.
- Dry promptly to reduce water spots.
Do not apply a stainless-steel polishing product to electrical components or a coated interior.
Cast-Aluminium Electric Skillet
Use mild soap and a non-abrasive sponge.
Dishwasher detergent may discolour some aluminium surfaces, even when the appliance is dishwasher-safe. Discolouration may be cosmetic, but the manual should determine the approved cleaning method.
Can You Soak an Electric Skillet?
You can soak only the parts that the manufacturer identifies as immersible.
Do not soak:
- The temperature probe
- Power cord
- Plug
- Powered heating base
- Non-immersible skillet body
- Electrical socket
Even with an immersible pan, avoid leaving it underwater overnight unless the manufacturer specifically allows prolonged soaking.
For most stubborn residue, a short 10–20-minute treatment with warm soapy water is sufficient.
Common Electric Skillet Cleaning Mistakes
Avoid these common errors:
- Cleaning the skillet while it is plugged in
- Pouring cold water into a hot pan
- Immersing the temperature control probe
- Assuming every skillet is dishwasher-safe
- Soaking a non-immersible base
- Using steel wool on a nonstick coating
- Scraping burnt food with a knife
- Spraying cleaner into the electrical socket
- Reconnecting the probe before the socket is dry
- Leaving grease in the skillet overnight
- Using oven cleaner or bleach
- Storing the skillet while it is damp
- Using aerosol cooking spray repeatedly on a nonstick surface
- Continuing to use a peeling or severely scratched coating
How to Keep an Electric Skillet Clean Longer
A few cooking habits can reduce cleaning time and protect the surface.
- Clean the skillet after every use.
- Use silicone, nylon, wooden, or approved plastic utensils.
- Avoid overheating an empty skillet.
- Use only the amount of cooking oil you need.
- Avoid aerosol cooking sprays when the manufacturer discourages them.
- Remove spills before they harden.
- Use low to medium heat when suitable for the recipe.
- Do not cut food inside the skillet.
- Place a soft pan protector inside before stacking cookware.
- Store the temperature probe separately.
- Keep the power cord loosely coiled.
- Store the skillet with the lid slightly open until fully dry.
Manufacturers commonly recommend silicone utensils because they are less likely to damage nonstick coatings.
When Should You Replace an Electric Skillet?
Cleaning cannot repair structural or electrical damage.
Consider replacing the skillet or contacting the manufacturer if you notice:
- Peeling or flaking nonstick coating
- Deep scratches that expose the metal
- A cracked or melted power cord
- Loose electrical pins
- Corrosion inside the socket
- Cracks in the skillet body
- A shattered or badly chipped lid
- Sparks when connecting the probe
- A persistent electrical burning smell
- Temperature that changes uncontrollably
- A probe that no longer fits securely
- Heating that continues after the control is switched off
Do not try to repair a power cord, controller, or heating element with household tape or adhesive.
Quick Electric Skillet Cleaning Checklist
| Skillet Part | Recommended Cleaning Method | What to Avoid |
|---|---|---|
| Nonstick cooking surface | Warm water, mild soap, soft sponge | Steel wool and metal scrapers |
| Ceramic surface | Soft sponge and gentle baking soda treatment | Aggressive scrubbing |
| Stainless-steel insert | Warm soapy water and non-abrasive sponge | Cleaner on coated or electrical areas |
| Glass lid | Warm soapy water after cooling | Sudden temperature changes |
| Temperature probe | Dry or barely damp soft cloth | Immersion and dishwasher |
| Electrical socket | Dry cloth and complete air-drying | Direct water or cleaner spray |
| Exterior | Damp cloth | Submerging a non-immersible base |
| Drip tray | Warm soapy water if removable | Reinstalling while wet |
| Burnt residue | Short soak or baking soda paste | Knives and metal pads |
| Sticky oil film | Repeated gentle washing | Harsh solvent or oven cleaner |
Frequently Asked Questions
Can You Submerge an Electric Skillet in Water?
Only submerge an electric skillet when its manufacturer states that the skillet body is fully immersible after the temperature control probe has been removed. Never immerse the probe, power cord, or plug.
Can You Wash an Electric Skillet in the Sink?
Yes, if the removable pan or skillet body is approved for sink washing. A non-immersible model should be cleaned with a damp sponge rather than placed in a sink full of water.
Can You Put an Electric Skillet in the Dishwasher?
Only if the user manual says the skillet body or removable pan is dishwasher-safe. Remove the temperature probe first. Hand-washing may still help the cooking surface last longer.
How Do You Clean an Electric Skillet That Does Not Come Apart?
Unplug it, let it cool, and wipe out loose residue. Clean the interior with a damp soapy sponge, then wipe away the soap with a clean damp cloth. Keep water away from the base and electrical socket.
Can You Use Baking Soda on an Electric Skillet?
Baking soda can be used carefully on many compatible cooking surfaces. Mix it with a small amount of water, apply it to the stain, and wipe gently. Check the manual before using it on a delicate coating.
Can You Use Vinegar to Clean an Electric Skillet?
Diluted white vinegar may help remove stains, odours, or stubborn residue from a compatible surface. Do not allow it to enter the socket, and do not use it if the manufacturer advises against acidic cleaners.
How Do You Remove Burnt Food From a Nonstick Electric Skillet?
Let warm soapy water soften the residue, then use a silicone scraper or soft sponge. For stubborn spots, apply a gentle baking soda paste. Do not use a knife, steel wool, or metal scouring pad.
Why Is My Electric Skillet Sticky After Cleaning?
The stickiness may be caused by old oil, aerosol cooking-spray buildup, food residue, or soap that was not completely rinsed away. Wash it again with warm soapy water and use a gentle baking soda treatment if necessary.
Can You Soak an Electric Skillet Overnight?
It is generally better not to soak an electric skillet overnight. Prolonged soaking may affect some finishes, and non-immersible electrical components must remain dry. Follow the model’s manual.
How Do You Clean the Bottom of an Electric Skillet?
Wipe a non-immersible bottom with a damp cloth and dry it immediately. If the entire skillet body is approved for immersion, wash it according to the manufacturer’s instructions while keeping the probe separate.
What Should You Do If the Electric Skillet Plug Gets Wet?
Keep it unplugged and do not test it. Dry the exterior and allow the component to dry completely. Seek manufacturer or professional advice if water entered the plug housing or you notice damage.
Can You Use Steel Wool on an Electric Skillet?
No. Steel wool can scratch nonstick and ceramic surfaces and may damage electrical pins. Use a soft sponge or manufacturer-approved nylon cleaning pad instead.
How Often Should You Clean an Electric Skillet?
Clean the cooking surface, lid, and grease tray after every use. Deep-clean it when you notice burnt residue, sticky oil, stains, or lingering odours.
Can a Scratched Electric Skillet Be Repaired?
Cleaning will not repair a scratched or peeling coating. Stop using harsh utensils and contact the manufacturer if the damage is severe. Replace the skillet when the coating is flaking or the underlying metal is exposed.
Final Thoughts
Knowing how to clean an electric skillet correctly can make the appliance easier to use, reduce stubborn grease buildup, and help protect its cooking surface.
The most important steps are to unplug the skillet, let it cool, remove the temperature probe, use gentle cleaning tools, and dry the electrical connection completely.
Because electric skillet designs vary, always check the user manual before immersing the body, soaking the pan, or placing any part in a dishwasher. A few minutes of careful cleaning after each meal can prevent burnt residue and sticky grease from becoming a much bigger problem later.

“I believe great cooking starts with the right tools, trusted advice, and a little confidence in the kitchen.”
Hi, I’m Emma Carter. My love for cooking began in my grandmother’s kitchen, where I learned that every great meal starts with simple ingredients and the right cookware. Over the years, I’ve spent countless hours researching, testing, and comparing kitchen appliances, cookware, coffee makers, air fryers, and other everyday kitchen essentials.
Here at KiCook, my goal is to make your buying decisions easier with honest product reviews, practical buying guides, and easy-to-follow cooking tips. Whether you’re upgrading your kitchen or searching for the best appliance for your home, I focus on providing clear, reliable, and research-backed information you can trust.
When I’m not testing new kitchen gadgets or writing in-depth guides, you’ll usually find me trying new recipes, visiting local farmers’ markets, or enjoying a quiet cup of coffee while planning my next kitchen project.