Yes, you can cook rice in an electric skillet, and it works surprisingly well when you control the heat, use the right amount of liquid, and keep the lid closed while the rice cooks.
A deep electric skillet with a tight-fitting lid can handle white rice, jasmine rice, basmati rice, brown rice, and even one-pan rice meals. The basic method is simple: bring the rice and liquid to a boil, lower the temperature to a gentle simmer, cover the skillet, and let the rice absorb the liquid before resting and fluffing.
The biggest difference from cooking rice in a saucepan is the size of the cooking surface. An electric skillet is usually wider, so moisture can evaporate faster if the lid does not seal well. That makes the rice-to-water ratio and temperature especially important.
If you are still exploring everything this appliance can do, KiCook’s guide to what you can cook in an electric skillet covers dozens of other meals and cooking methods.
Can You Cook Rice in an Electric Skillet or Electric Frying Pan?
Yes. An electric skillet and an electric frying pan are essentially the same type of countertop appliance for this purpose.
Rice needs three things to cook properly:
- Enough liquid
- Controlled heat
- Trapped steam
A covered electric skillet can provide all three.
The heating element underneath brings the water to a boil, while the lid traps steam. Once you reduce the heat, the rice slowly absorbs the water until the grains become tender.
A deeper skillet works better than a very shallow one because rice expands considerably as it cooks.
Why Use an Electric Skillet to Cook Rice?
An electric skillet probably will not replace a dedicated rice cooker for everyone, but it has several practical advantages.
You can control the cooking temperature directly instead of relying on a stovetop burner. You can also sauté onions, garlic, spices, vegetables, or meat in the same pan before adding your rice.
That makes an electric skillet particularly useful for:
- Small kitchens
- Apartments
- RVs
- Dorm-style cooking where appliances are permitted
- Holiday cooking when stovetop space is limited
- One-pan dinners
- Cooking without turning on a full-size stove
The wide cooking surface also makes it easy to turn plain rice into chicken and rice, vegetable rice, Spanish-style rice, or fried rice.
Pros and Cons of Cooking Rice in an Electric Skillet
| Pros | Cons |
|---|---|
| Adjustable temperature control | Requires more attention than a rice cooker |
| Useful for one-pan meals | Wide skillets may lose moisture faster |
| Can sauté ingredients before adding rice | Poor-fitting lids can cause uneven results |
| Easy to make larger batches | Hot spots may cause bottom burning |
| Portable countertop appliance | Exact settings vary between models |
| Can cook much more than rice | Not every skillet has a true low simmer setting |
What You Need to Cook Rice in an Electric Skillet
You do not need any unusual equipment.
Ingredients
For a basic batch of long-grain white rice:
- 1 cup uncooked long-grain white rice
- 1 3/4 cups water
- 1/2 teaspoon salt, optional
- 1 teaspoon butter or oil, optional
Chicken stock, vegetable stock, or another suitable broth can replace some or all of the water if you want more flavor.
Equipment
You will need:
- Electric skillet
- Tight-fitting lid
- Measuring cup
- Fine-mesh strainer
- Fork or rice paddle
A clear glass lid is particularly handy because you can check what is happening without repeatedly opening the skillet.
Best Rice-to-Water Ratio for an Electric Skillet
There is no single perfect water ratio for every type of rice.
Rice variety, skillet width, lid design, altitude, and even the brand of rice can affect how much liquid you need.
Use this chart as a starting point:
| Rice Type | Rice | Starting Liquid | Approximate Cooking Time |
|---|---|---|---|
| Long-grain white rice | 1 cup | 1 3/4 cups | 18–20 minutes |
| Jasmine rice | 1 cup | About 1 1/2 cups | 15–18 minutes |
| Basmati rice | 1 cup | About 1 1/2 cups | 15–20 minutes |
| Medium/short-grain white rice | 1 cup | About 1 1/2 cups | 20–25 minutes |
| Brown rice | 1 cup | 2–2 1/4 cups | 35–45 minutes |
| Wild rice | 1 cup | About 3 cups | 45–55 minutes |
| Instant rice | 1 cup | Follow package directions | Usually 5–10 minutes |
These are starting points rather than universal rules. Utah State University Extension’s rice cooking guidance similarly shows that water requirements and cooking times vary considerably by rice type.
For another useful reference, see the USA Rice guide to cooking rice. It recommends measuring the rice and liquid accurately and notes that different varieties may need different amounts of water.
How Much Water for 1 Cup of Rice?
For regular long-grain white rice, start with about:
1 cup rice + 1 3/4 cups water
If your skillet has a loose-fitting or vented lid and loses a lot of steam, you may need slightly more.
If the rice package gives specific instructions for that variety, use those directions as your starting point.
What About 2 or 3 Cups of Rice?
You can scale the recipe, but do not assume a large batch always needs exactly the same proportional increase in water.
A simple starting point for regular white rice is:
- 1 cup rice: about 1 3/4 cups liquid
- 2 cups rice: about 3 1/2 cups liquid
- 3 cups rice: adjust according to the rice package and skillet capacity
The most important rule is to leave enough empty space in the skillet for bubbling, steam, and rice expansion.
What Temperature Should You Cook Rice at in an Electric Skillet?
Temperature control is where an electric skillet can be especially useful.
Start around 300–350°F (150–175°C) to bring the liquid to a boil.
Once it boils, immediately reduce the skillet to the lowest setting that maintains a gentle simmer. Depending on your model, this may be somewhere around 200–250°F (93–120°C).
Electric skillet thermostats cycle on and off, so the number on the dial represents a target rather than a perfectly constant surface temperature.
If you are unsure how your appliance’s dial translates into real cooking temperatures, KiCook’s electric skillet medium-heat temperature guide can help you understand the settings.
Temperature for Bringing Water to a Boil
Try approximately:
300–350°F / 150–175°C
You do not need to blast the skillet at its maximum temperature.
The goal is simply to bring the liquid to a steady boil.
Temperature for Simmering Rice
Once boiling begins, turn the heat down.
You want gentle bubbling underneath the lid—not violent boiling.
If your skillet’s lowest numbered cooking temperature is 250°F (120°C), use that and watch how aggressively the liquid simmers. Some models require lowering the dial until the thermostat reaches its natural simmer point rather than following one exact number.
Do You Need to Preheat an Electric Skillet for Rice?
Not always.
If you are making basic steamed rice, you can often place the rice and water in the skillet before heating it.
Preheating becomes useful when you want to:
- Toast the rice
- Sauté onions or garlic
- Brown meat
- Cook vegetables before adding rice
- Melt butter and bloom spices
If you are simply cooking plain rice by the absorption method, starting with rice and cool water is perfectly practical.
Always check your skillet’s manual because manufacturers may recommend different procedures.
Should You Rinse or Soak Rice Before Cooking?
Rinsing and soaking are two different steps.
When to Rinse Rice
Rinsing white rice removes loose starch from the surface.
That can help the grains cook with a cleaner, less gummy texture.
Place the rice in a fine-mesh strainer and rinse it under cool water until the runoff becomes noticeably clearer.
You do not need to scrub the grains.
When Soaking Helps
Soaking is optional for most everyday white rice.
It can be more useful for certain varieties, especially basmati, because hydration begins before the rice reaches the skillet.
If the package specifically recommends soaking, follow those instructions.
Instant or precooked rice usually should not be soaked unless the manufacturer tells you to do so.
How to Cook Rice in an Electric Skillet Step by Step
Once you understand the temperature changes, the process is straightforward.
Step 1: Measure the Rice and Liquid
For a simple batch, measure:
- 1 cup long-grain white rice
- 1 3/4 cups water
Use the same measuring cup for both.
That is particularly helpful for readers in the USA, UK, Canada, and Australia, where standard cup measurements are not always identical. The ratio matters more than the exact cup size.
Step 2: Rinse the Rice
Place the rice in a fine-mesh strainer.
Rinse with cool water for 20–30 seconds, gently moving the grains with your fingers.
Drain thoroughly.
Step 3: Prepare the Electric Skillet
Place the skillet on a stable, heat-resistant surface.
Make sure the temperature probe is inserted correctly and the lid fits properly.
If you are starting with rice and water together, you do not need to preheat.
Step 4: Toast the Rice if Desired
For slightly nuttier flavor, add about a teaspoon of butter or oil.
Set the skillet to roughly 300°F (150°C).
Add the drained rice and stir gently for one or two minutes.
Do not brown it heavily.
This step is optional.
Step 5: Add Water or Broth
Carefully pour in the measured liquid.
Add salt if desired.
You can use:
- Water
- Chicken broth
- Vegetable broth
- Beef broth for suitable savory dishes
Broth makes plain rice more flavorful without adding much extra work.
Step 6: Bring It to a Boil
Set the temperature around 300–350°F (150–175°C).
Wait until the liquid begins bubbling steadily.
Stir once to make sure no rice is stuck in one area.
Step 7: Reduce the Temperature
As soon as the water boils, reduce the heat to the skillet’s low or simmer range.
Usually, somewhere around 200–250°F (93–120°C) works, depending on the appliance.
Do not continue boiling aggressively.
Step 8: Cover and Simmer
Place the lid on the skillet.
Cook the rice without repeatedly opening the lid.
For long-grain white rice, start checking around 18 minutes.
Opening the lid releases heat and steam, which can extend cooking time.
Step 9: Check for Doneness
The rice is ready when:
- Most or all visible liquid has disappeared
- The grains are tender
- There is no hard, chalky center
- Small steam holes may be visible across the surface
If the rice is almost tender but still slightly firm, add 2–3 tablespoons of hot water, cover again, and cook for a few more minutes.
Step 10: Turn Off the Skillet and Rest the Rice
Once the rice is tender, switch the skillet off.
Leave the lid on for another 5–10 minutes.
This resting period allows moisture to redistribute throughout the rice.
Step 11: Fluff and Serve
Remove the lid.
Use a fork or rice paddle to gently separate the grains.
Avoid aggressively stirring the rice, which can break the grains and make the texture sticky.
Quick Electric Skillet Rice Recipe
Prep time: 5 minutes
Cook time: About 18–20 minutes
Resting time: 5–10 minutes
Servings: About 3
Ingredients
- 1 cup long-grain white rice
- 1 3/4 cups water or broth
- 1/2 teaspoon salt
- 1 teaspoon butter or oil, optional
Instructions
- Rinse the rice and drain well.
- Add rice and water to the electric skillet.
- Add salt and butter if using.
- Set the skillet to about 325°F (163°C).
- Bring the liquid to a boil.
- Reduce the skillet to a low simmer, usually around 200–250°F (93–120°C).
- Cover tightly.
- Cook for about 18 minutes without repeatedly opening the lid.
- Check that the liquid has been absorbed and the rice is tender.
- Turn the skillet off.
- Let the rice rest, covered, for 5–10 minutes.
- Fluff and serve.
If your rice package recommends a different liquid ratio or cooking time, follow the package directions and use the electric skillet to reproduce the same boil-then-simmer method.
How Long Does Rice Take in an Electric Skillet?
Cooking time depends much more on the rice variety than on the appliance itself.
White Rice
Most regular long-grain white rice takes around 18–20 minutes, followed by a short resting period.
Jasmine Rice
Jasmine rice usually cooks in roughly 15–18 minutes.
It generally needs less liquid than standard long-grain white rice.
Basmati Rice
Basmati commonly takes around 15–20 minutes, depending on whether it has been soaked first.
Brown Rice
Brown rice needs much longer because the outer bran layer remains intact.
Expect approximately 35–45 minutes, sometimes longer.
Short-Grain Rice
Short-grain rice often takes around 20–25 minutes, but cooking directions can vary significantly depending on whether you are preparing everyday short-grain rice or sushi-style rice.
Wild Rice
Wild rice is not actually the same grain as conventional white rice and usually requires substantially more cooking time.
Plan on approximately 45–55 minutes.
Instant or Minute Rice
Follow the package instructions.
Instant rice has already been partially or fully cooked and dehydrated, so treating it like raw long-grain rice can make it mushy.
What If Your Electric Skillet Has a Rice Setting?
Some multifunction electric skillets have dedicated rice programs.
If yours includes settings such as:
- Rice
- Rice 1
- Rice 2
- White Rice
- Brown Rice
use the manufacturer’s instructions instead of manually overriding the cycle.
Some programmed skillets automatically heat the liquid, reduce the temperature after boiling, and then switch to a warm setting when cooking finishes.
This is one area where reading your model’s manual is more valuable than following a universal temperature recommendation.
How to Tell When Rice Is Done
Do not judge rice only by the clock.
Look for several signs together.
Properly cooked rice should:
- Feel tender when bitten
- Have no hard center
- Have absorbed the cooking liquid
- Separate reasonably well when fluffed
- Smell pleasantly cooked rather than toasted or burnt
If you tilt the skillet slightly and see a pool of water, it probably needs more time.
If there is no water left but the rice is crunchy, add a small amount of hot water rather than continuing to cook it dry.
How to Keep Rice From Sticking to an Electric Skillet
A little sticking around the edges can happen, but a thick burnt layer usually means something needs adjusting.
To reduce sticking:
- Rinse excess starch from the rice.
- Use enough water.
- Reduce the heat as soon as the liquid boils.
- Keep the skillet covered.
- Avoid unnecessarily stirring during cooking.
- Add a teaspoon of butter or oil if desired.
- Turn the skillet off when the liquid has been absorbed.
- Let the rice rest before fluffing.
If food has recently started sticking even when your technique has not changed, the cooking surface may be part of the problem. KiCook explains common causes in its guide to why food sticks to an electric skillet.
Common Electric Skillet Rice Problems and Fixes
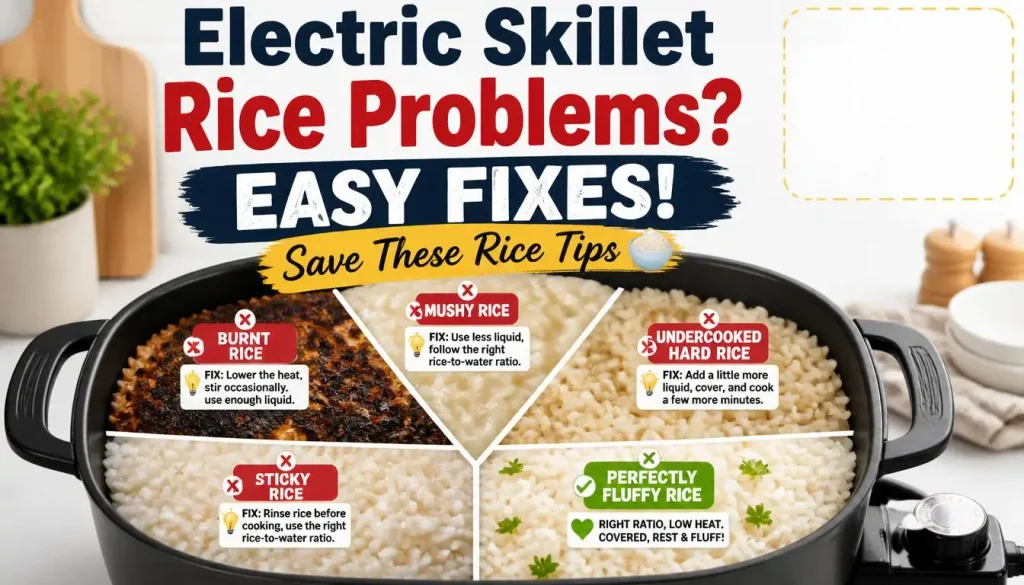
Rice is simple, but small changes in water and temperature can produce very different results.
Rice Is Hard or Undercooked
If the water is gone but the rice is still firm:
- Add 2–4 tablespoons of hot water.
- Cover the skillet.
- Keep it on low heat.
- Cook another 3–5 minutes.
- Rest before checking again.
Do not pour in another full cup of water unless the rice is extremely undercooked.
Rice Is Too Wet or Mushy
Too much liquid is usually the cause.
If the grains are already tender but some moisture remains, remove the lid and let the skillet sit on very low heat for a minute or two.
For your next batch, slightly reduce the liquid.
Mushy rice cannot be completely reversed, but letting it rest uncovered briefly can improve the texture.
Rice Is Burning on the Bottom
Bottom burning usually means:
- The simmer temperature is too high.
- The skillet has a hot spot.
- There is not enough liquid.
- The rice cooked too long after absorbing the water.
- The thermostat is inaccurate.
If your skillet repeatedly burns food even on low settings, it may be worth checking KiCook’s guide on how to tell whether an electric skillet thermostat is broken.
Rice Is Sticking
A small amount of butter or oil can help, but heat control matters more.
Avoid scraping the rice aggressively while it cooks.
If you have a nonstick electric skillet, use utensils that will not scratch the cooking surface.
Rice Is Cooking Unevenly
Uneven rice can happen when:
- The skillet has a very wide cooking surface.
- The heating element has hot and cool areas.
- The lid does not seal well.
- One side of the skillet contains significantly more rice.
Spread the rice evenly before covering it.
Do not repeatedly stir once simmering begins.
Water Is Boiling Over
Reduce the temperature immediately.
The liquid needs only a gentle simmer after the initial boil.
Also check whether your batch is too large for the skillet.
The Water Is Gone but the Rice Is Still Crunchy
This is one of the easiest rice problems to fix.
Add a small splash of hot water, cover, and continue cooking gently.
The rice needs additional moisture—not stronger heat.
Can You Cook Different Types of Rice in an Electric Skillet?
Yes, but you should adjust the water and time instead of treating every variety the same way.
Long-Grain White Rice
This is one of the easiest types for beginners.
It produces relatively separate, fluffy grains and usually cooks in about 18–20 minutes.
Jasmine Rice
Jasmine rice has a soft texture and distinctive aroma.
Use slightly less water than you might use for standard long-grain rice and avoid overcooking it.
Basmati Rice
Rinse basmati well.
Soaking for 15–30 minutes is optional but can help some varieties cook more evenly and produce longer-looking grains.
Drain thoroughly before adding the measured cooking liquid.
Brown Rice
Brown rice requires more liquid and considerably more time.
Keep it covered during cooking and check the texture before turning the skillet off.
Short-Grain or Sushi Rice
Short-grain rice naturally contains more starch and tends to become more cohesive.
Follow the rice package instructions closely, especially if you are making sushi rice where texture matters.
Wild Rice and Rice Blends
Wild rice and mixed-grain blends often contain grains with different cooking requirements.
Package instructions should take priority because blends vary substantially between brands.
Can You Cook Instant or Minute Rice in an Electric Skillet?
Yes.
However, do not use the same method you would use for uncooked long-grain rice.
Instant rice has been processed so it rehydrates much faster.
Generally:
- Heat the required amount of water.
- Add the instant rice.
- Follow the package cooking or standing time.
- Remove from heat when instructed.
Some instant rice only needs to sit in hot water for several minutes.
How Much Rice Can You Cook in an Electric Skillet?
That depends on the skillet’s capacity.
Remember that uncooked rice increases substantially in volume as it absorbs water.
Do not fill the skillet to the top with rice and liquid.
You need room for:
- Bubbling
- Steam
- Expansion
- Stirring before cooking
- Adding vegetables or protein
For your first attempt, a 1- or 2-cup batch of uncooked rice is easier to manage.
Once you understand how your specific skillet handles moisture, you can increase the quantity.
Can You Cook Rice Without a Lid in an Electric Skillet?
You technically can cook rice using uncovered methods, but a lid is strongly recommended for normal steamed or absorption-style rice.
Without a lid:
- Steam escapes quickly.
- More water evaporates.
- The top grains may remain undercooked.
- The bottom can dry out before the rice becomes tender.
- You may need to add additional liquid.
A tight-fitting lid gives much more predictable results.
Should the Steam Vent Be Open or Closed?
For standard absorption-style rice, you generally want to retain steam rather than deliberately venting a large amount of it.
If your lid has an adjustable steam vent, follow the manufacturer’s rice or steaming instructions.
Different skillet designs behave differently, so your appliance manual should take priority over a universal recommendation.
Can You Use Chicken Broth Instead of Water?
Absolutely.
Cooking rice in broth is one of the easiest ways to add flavor.
You can use:
- Chicken broth
- Vegetable broth
- Beef broth
- Low-sodium stock
Utah State University Extension also lists broth as an option for cooking rice and other grains.
Keep an eye on salt. Commercial broth may already contain plenty of sodium, so taste before adding additional salt.
Can You Make One-Pot Rice Meals in an Electric Skillet?
Yes. In fact, one-pan meals are one of the best reasons to cook rice in an electric skillet.
The skillet gives you room to brown ingredients first and then simmer everything together.
KiCook’s guide to electric skillet casseroles includes rice dishes among the meals that work well in deeper covered skillets.
Chicken and Rice
You can brown appropriately sized pieces of chicken, add seasonings, rice, broth, and vegetables, and finish the meal under the lid.
When cooking raw chicken, food safety matters more than the cooking time printed in a recipe. USDA guidance says poultry should reach a minimum internal temperature of 165°F (73.9°C) when checked with a food thermometer.
For more detailed electric-skillet chicken technique, see KiCook’s guide on how to fry chicken in an electric skillet.
Rice and Vegetables
Vegetables such as peas, carrots, corn, bell peppers, mushrooms, and onions work well with rice.
Add delicate vegetables later so they do not become overcooked.
Rice and Beans
Rice and beans make an inexpensive one-pan meal.
Use cooked or canned beans unless your recipe has been specifically designed around the much longer cooking time required for dried beans.
Can You Make Fried Rice in an Electric Skillet?
Yes, and this is where the wide surface of an electric skillet becomes an advantage.
For good fried rice, use cold cooked rice when possible.
Freshly cooked rice contains more surface moisture and can become soft when stir-fried immediately.
A simple method is:
- Preheat the skillet to medium-high heat.
- Add a small amount of suitable cooking oil.
- Cook your vegetables.
- Cook egg or protein separately in the skillet if desired.
- Add cold rice.
- Break apart large clumps.
- Add soy sauce and seasonings.
- Toss until hot throughout.
Do not overcrowd the skillet. Fried rice needs enough exposed surface area for moisture to escape.
Electric Skillet vs Rice Cooker vs Stovetop: Which Is Better?
Each method has advantages.
| Feature | Electric Skillet | Rice Cooker | Stovetop Pot |
|---|---|---|---|
| Temperature control | Excellent | Mostly automatic | Good |
| Hands-off cooking | Moderate | Excellent | Moderate |
| One-pan meals | Excellent | Varies | Good |
| Sautéing ingredients | Excellent | Model-dependent | Excellent |
| Portability | Excellent | Excellent | Limited |
| Rice consistency | Good with practice | Excellent | Good with practice |
| Monitoring required | Moderate | Low | Moderate |
| Best for plain rice | Good | Excellent | Excellent |
| Best for chicken-and-rice meals | Excellent | Model-dependent | Excellent |
If you cook plain rice several times a week, a rice cooker is difficult to beat for convenience.
If you want one appliance that can make breakfast, fry meat, sauté vegetables, simmer sauces, and cook rice dishes, the electric skillet is far more versatile.
Tips for Perfect Electric Skillet Rice Every Time
A few habits make a noticeable difference.
Measure your liquid.
Guessing is one of the fastest ways to end up with crunchy or mushy rice.
Use the same cup for rice and water.
This keeps the ratio consistent regardless of regional measuring-cup differences.
Rinse most white rice.
It can reduce loose surface starch.
Use a tight-fitting lid.
Steam is part of the cooking process.
Reduce the heat immediately after boiling.
Rice should simmer, not continue boiling violently.
Do not keep opening the lid.
Every peek releases heat and steam.
Avoid unnecessary stirring.
Stirring releases starch and can make the texture gummy.
Rest the rice after cooking.
Five to ten minutes under the lid can make a surprisingly noticeable difference.
Adjust for your skillet.
One electric skillet may run hotter or lose more moisture than another.
Follow the rice package when necessary.
Specialty rice may have instructions that differ from general cooking ratios.
Can You Keep Rice Warm in an Electric Skillet?
Many electric skillets have a Warm setting, but there is an important food-safety distinction between keeping rice genuinely hot and simply leaving it in a lukewarm appliance.
USDA food-safety guidance recommends holding hot food at 140°F (60°C) or warmer.
If your skillet has a manufacturer-approved Keep Warm function capable of maintaining a safe holding temperature, it can be useful during serving.
Do not leave cooked rice sitting for hours at an uncertain warm temperature.
How to Store and Reheat Leftover Rice Safely
Leftover rice deserves a little extra attention because cooked rice that sits too long at room temperature can support the growth of Bacillus cereus.
FoodSafety.gov specifically lists rice and leftovers among foods associated with Bacillus cereus when they sit too long at room temperature. It recommends keeping hot food above 140°F (60°C), cold food at 40°F (4°C) or below, and refrigerating cooked food promptly in shallow containers.
For general leftover handling, see the USDA’s Leftovers and Food Safety guidance.
To Store Cooked Rice
- Transfer leftovers to shallow containers.
- Refrigerate promptly.
- Do not leave rice sitting on the counter for extended periods.
- Keep the refrigerator at 40°F (4°C) or colder.
To Reheat Rice
Add a splash of water to prevent drying.
Cover and heat until steaming hot throughout.
USDA guidance recommends reheating leftovers to 165°F (73.9°C).
Frequently Asked Questions
Can you make rice in an electric skillet?
Yes. A deep electric skillet with a good lid can cook rice using essentially the same absorption method used in a covered saucepan. Bring the rice and liquid to a boil, reduce to a gentle simmer, cover, and cook until the liquid is absorbed.
What temperature do you cook rice at in an electric skillet?
Start around 300–350°F (150–175°C) to bring the liquid to a boil. Then reduce the skillet to a low simmer, often somewhere around 200–250°F (93–120°C), depending on the model.
How much water do I use for 1 cup of rice?
For long-grain white rice, about 1 3/4 cups of water for 1 cup of rice is a useful starting point. Different rice varieties require different ratios, so check the package instructions when available.
How long does 1 cup of rice take in an electric skillet?
Long-grain white rice generally takes about 18–20 minutes once it is simmering, followed by 5–10 minutes of resting time.
Do I need to preheat the electric skillet?
Not for basic steamed rice. You can start with rice and water in a cold skillet. Preheating is useful if you want to toast the rice or sauté other ingredients first.
Do I need to rinse rice first?
Rinsing is recommended for many white rice varieties because it removes loose surface starch and can help the grains remain more separate. However, package instructions should take priority for specialty or enriched rice.
Can I cook brown rice in an electric skillet?
Yes. Brown rice usually needs more liquid and more time than white rice. Expect roughly 35–45 minutes for many varieties.
Can I cook jasmine rice in an electric skillet?
Yes. Jasmine rice works well in a covered electric skillet. It generally needs slightly less water than ordinary long-grain white rice and cooks relatively quickly.
Can I cook basmati rice in an electric skillet?
Yes. Rinse basmati rice well before cooking. Optional soaking can help certain varieties cook evenly, but follow the package instructions for the best ratio.
Can I cook Minute Rice or instant rice in an electric skillet?
Yes, but use the package instructions. Instant rice cooks much faster than regular uncooked rice and may only need several minutes in hot water.
Can I use broth instead of water?
Yes. Chicken, vegetable, or beef broth can add considerable flavor. Reduce additional salt if the broth already contains sodium.
Why does my rice burn in an electric skillet?
The most common causes are excessive simmering temperature, too little liquid, leaving the rice on the heat after the water is gone, or uneven heating from the appliance.
Why is my rice still hard after the water is gone?
The rice needs more moisture. Add a few tablespoons of hot water, cover the skillet, and continue cooking on low heat for several minutes.
Can I leave cooked rice on the Warm setting?
Only if the setting maintains a safe hot-holding temperature. USDA guidance recommends holding hot foods at 140°F (60°C) or warmer. Otherwise, refrigerate the rice promptly.
Is an electric skillet the same as an electric frying pan?
For everyday cooking purposes, the terms are generally used for the same type of appliance: a countertop pan with an integrated electric heating system and adjustable temperature control.
Final Thoughts
So, can you cook rice in an electric skillet? Absolutely.
The electric skillet is particularly useful when you do not have access to a stovetop, need extra cooking space, or want to turn plain rice into a complete one-pan meal.
The formula for reliable results is simple:
Use the right rice-to-water ratio, bring the liquid to a boil, reduce the temperature to a gentle simmer, keep the lid closed, and let the rice rest before fluffing.
For a basic cup of long-grain white rice, start with about 1 3/4 cups of water and roughly 18–20 minutes of covered cooking. Then adjust future batches based on your rice variety and the way your particular electric skillet holds heat and moisture.
Once you understand those small adjustments, cooking rice in an electric skillet becomes just as practical as cooking it in a regular covered pot—and the skillet gives you the added advantage of turning that rice into fried rice, chicken and rice, vegetable rice, or countless other one-pan meals.

“I believe great cooking starts with the right tools, trusted advice, and a little confidence in the kitchen.”
Hi, I’m Emma Carter. My love for cooking began in my grandmother’s kitchen, where I learned that every great meal starts with simple ingredients and the right cookware. Over the years, I’ve spent countless hours researching, testing, and comparing kitchen appliances, cookware, coffee makers, air fryers, and other everyday kitchen essentials.
Here at KiCook, my goal is to make your buying decisions easier with honest product reviews, practical buying guides, and easy-to-follow cooking tips. Whether you’re upgrading your kitchen or searching for the best appliance for your home, I focus on providing clear, reliable, and research-backed information you can trust.
When I’m not testing new kitchen gadgets or writing in-depth guides, you’ll usually find me trying new recipes, visiting local farmers’ markets, or enjoying a quiet cup of coffee while planning my next kitchen project.