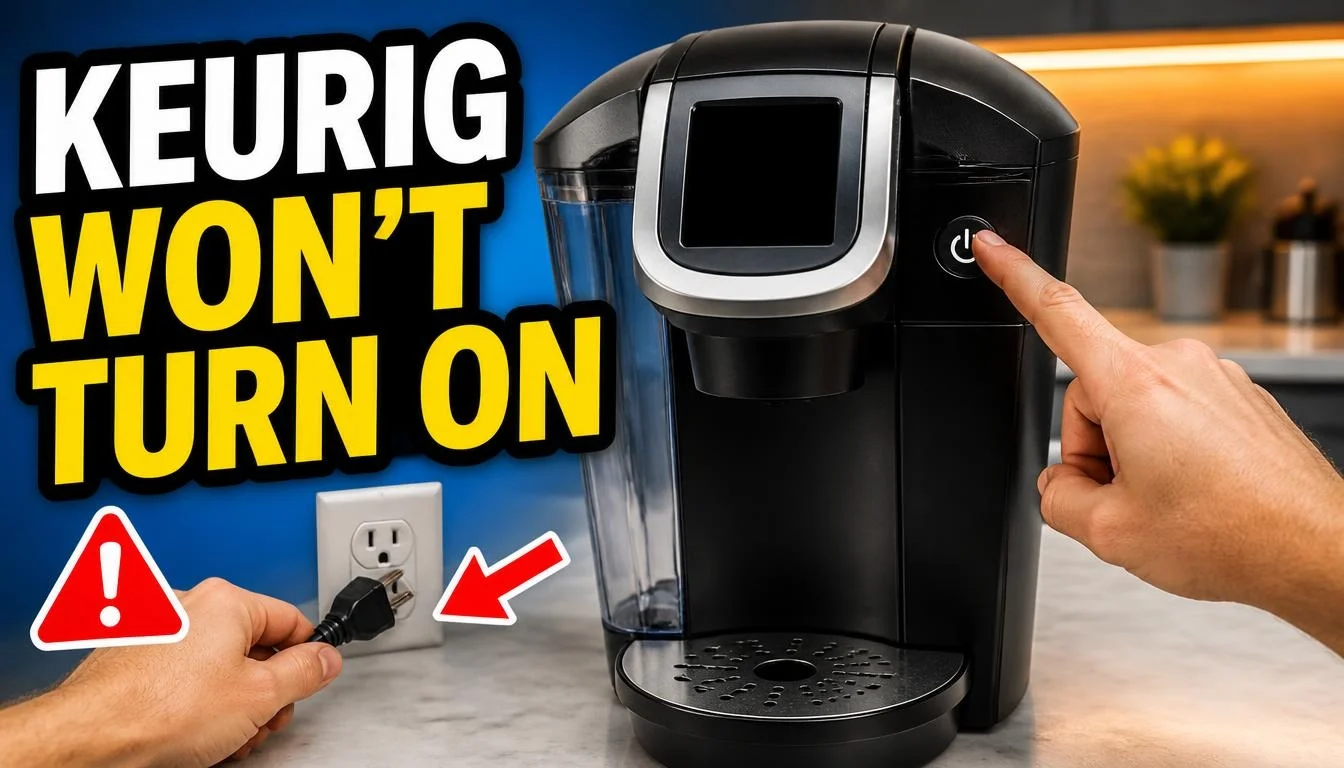
Quick Answer: If your Keurig won’t turn on, first check the power cord, wall outlet, and circuit breaker. Make sure the plug is fully inserted and try another compatible, working outlet. Then check the power button or startup procedure for your specific Keurig model. If the machine still has no power, an internal electrical fault may need professional attention.
A Keurig coffee maker can stop working without much warning. You press the power button, but nothing happens. There are no lights, the display stays blank, and the machine does not respond.
This can be frustrating, especially when you need your morning coffee.
The good news is that a Keurig that won’t turn on is not always broken. A loose plug, faulty outlet, tripped circuit breaker, or incorrect startup procedure can sometimes explain the problem.
However, the right solution depends on your Keurig model and what happened before the machine stopped working.
In this guide, I’ll walk you through eight practical troubleshooting steps. You’ll learn how to check the electrical supply, identify model-specific power controls, and recognize signs that your brewer needs professional service.
How to Tell If Your Keurig Has a Power Problem
Before trying different fixes, pay attention to what your Keurig does when you press the power button.
Not every startup problem means the machine has lost electrical power. The display, indicator lights, and other symptoms can help you narrow down the cause.
Use this table as a starting point.
| What You Notice | Possible Cause | What to Check First |
|---|---|---|
| No lights or display | Power supply problem | Plug and electrical outlet |
| Power button does nothing | Incorrect startup procedure or electrical fault | Model-specific power controls |
| Screen remains completely blank | Power supply or internal display problem | Outlet and power connection |
| Machine turns off after sitting unused | Automatic shutoff feature | Auto Off settings |
| Machine worked before a power outage | Interrupted electrical supply | Outlet and circuit breaker |
| Machine has lights but will not brew | Brewing or water-related problem | Reservoir and brewing controls |
| Machine stopped working after cold storage | Internal water may be frozen or the brewer is extremely cold | Room temperature and storage instructions |
One important distinction: a Keurig that has no lights and does not respond is different from a Keurig that turns on but refuses to make coffee.
If your machine has power but will not start a brewing cycle, read our guide on Keurig Not Brewing? 11 Easy Fixes to Get It Working Again.
8 Ways to Fix a Keurig That Won’t Turn On
Try these fixes in order. Start with the electrical connection before moving on to model-specific settings or possible internal problems.
1. Check the Power Cord and Plug Connection
A loose power connection is one of the first things worth checking.
Your Keurig may appear completely dead simply because the plug has moved slightly out of the outlet. This can happen when you clean the counter, move the coffee maker, or pull another appliance away from the wall.
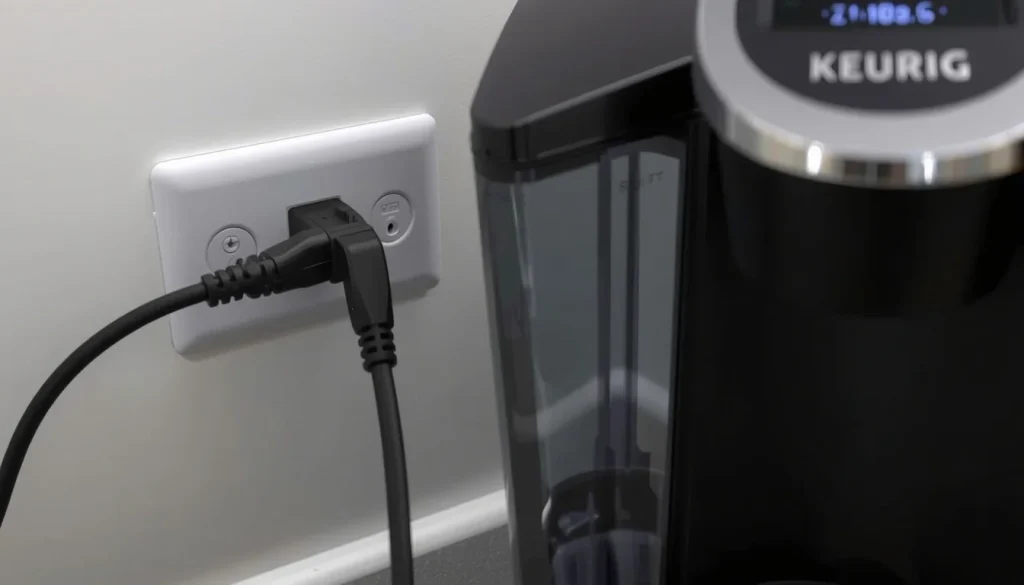
Here’s what to do:
- Turn off the Keurig if its controls still respond.
- Check where the power cord connects to the wall outlet.
- Make sure the plug is pushed firmly into the outlet.
- If your model has a detachable power cord, check that its connection to the brewer is secure.
- Look at the visible cord for cuts, exposed wires, melting, or other damage.
Never pull the cord to disconnect the machine. Hold the plug instead.
Also, do not use the brewer if its cord or plug is damaged. Avoid taping a damaged cable or trying to repair it yourself.
If the connection looks normal, move to the next step.
2. Test Your Wall Outlet With Another Appliance
Sometimes the Keurig is fine, but the electrical outlet is not working.
A wall outlet may stop supplying power because of a loose electrical connection, a tripped protective device, or another household electrical problem.
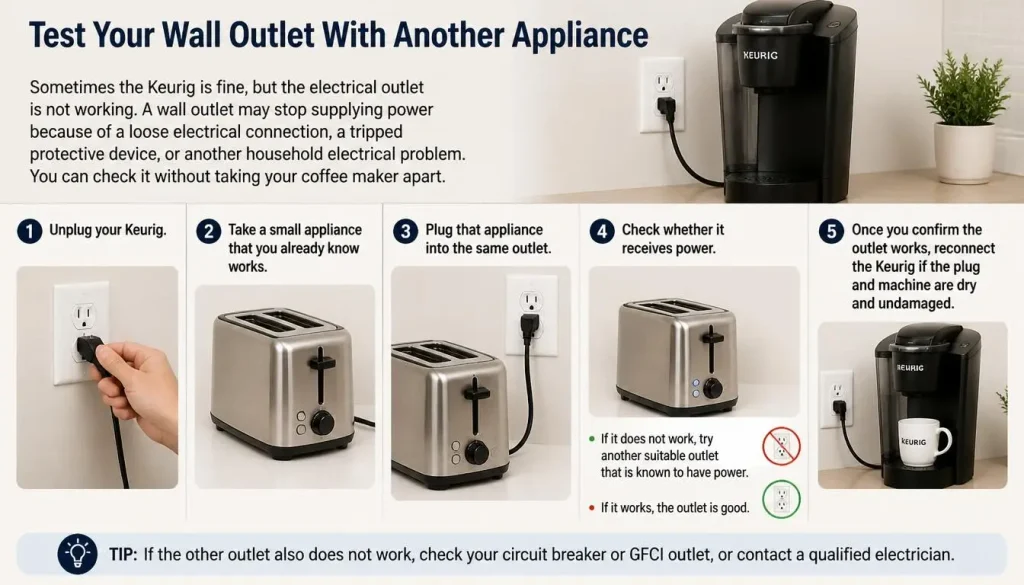
You can check it without taking your coffee maker apart.
Follow these steps:
- Unplug your Keurig.
- Take a small appliance that you already know works.
- Plug that appliance into the same outlet.
- Check whether it receives power.
- If it does not work, try another suitable outlet that is known to have power.
- Once you confirm the outlet works, reconnect the Keurig if the plug and machine are dry and undamaged.
If another appliance works in the outlet but your Keurig does not, the problem may be with the brewer or its power cord.
What if the Keurig works in another outlet?
You may have a problem with the original outlet or its electrical circuit. Have an electrician check it rather than continuing to use an unreliable connection.
One more thing matters for readers in different countries: check the voltage rating on your Keurig before trying another outlet.
Some North American Keurig models, including the K-Supreme, are rated at 120 volts. A simple travel plug adapter does not convert voltage. Never connect a 120V-only brewer directly to a 220–240V supply.
Check the rating label and user guide for your exact model before connecting it to a different country’s electrical supply.
3. Check the GFCI Outlet or Circuit Breaker
If your Keurig suddenly stopped working, a tripped electrical safety device may be responsible.
In the United States and Canada, many kitchens have GFCI outlets. These outlets can disconnect power when they detect a possible electrical fault.
In the UK and Australia, similar protection may be provided through an RCD or another protective device in the electrical panel.
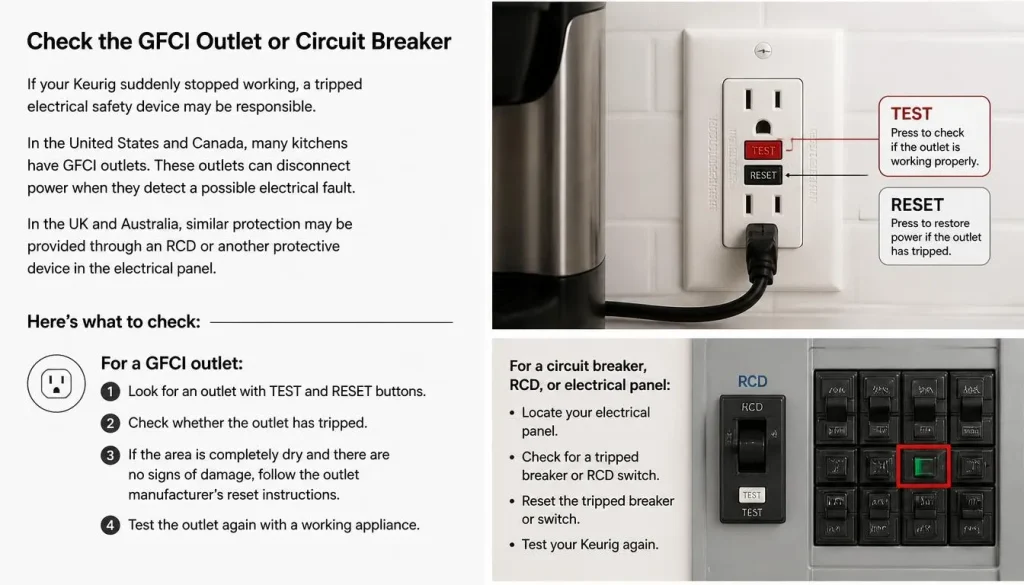
Here’s what to check:
For a GFCI outlet:
- Look for an outlet with TEST and RESET buttons.
- Check whether the outlet has tripped.
- If the area is completely dry and there are no signs of damage, follow the outlet manufacturer’s reset instructions.
- Test the outlet again with a working appliance.
For a circuit breaker or RCD:
- Check your household electrical panel.
- Look for a switch that has moved to the tripped or OFF position.
- Follow the panel or device instructions if you need to reset it.
- Check whether the Keurig receives power again.
Do not repeatedly reset a breaker or RCD that trips again. This can indicate an electrical fault.
Never touch a wet plug, outlet, or electrical panel with wet hands. Get help from a qualified electrician if you are unsure.
4. Check the Correct Power Button for Your Keurig Model
This is an easy step to overlook.
Different Keurig coffee makers use different startup controls. If you follow instructions for the wrong model, you may think the machine is broken when it simply needs a different action to power on.
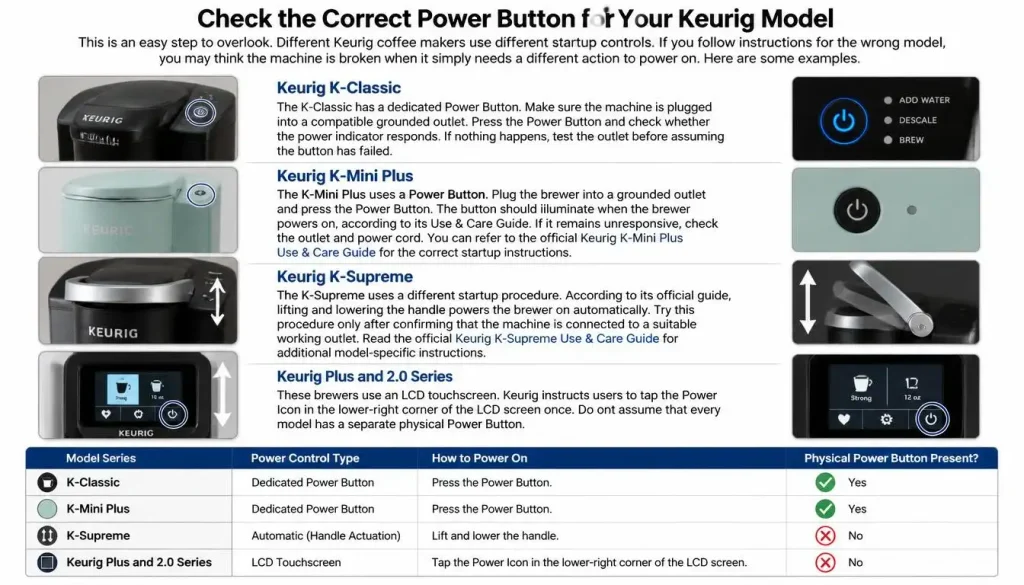
Here are some examples.
Keurig K-Classic
The K-Classic has a dedicated Power Button.
Make sure the machine is plugged into a compatible grounded outlet. Press the Power Button and check whether the power indicator responds.
If nothing happens, test the outlet before assuming the button has failed.
Keurig K-Mini Plus
The K-Mini Plus uses a Power Button.
Plug the brewer into a grounded outlet and press the Power Button. The button should illuminate when the brewer powers on, according to its Use & Care Guide.
If it remains unresponsive, check the outlet and power cord.
You can refer to the official Keurig K-Mini Plus Use & Care Guide for the correct startup instructions.
Keurig K-Supreme
The K-Supreme uses a different startup procedure.
According to its official guide, lifting and lowering the handle powers the brewer on automatically.
Try this procedure only after confirming that the machine is connected to a suitable working outlet.
Read the official Keurig K-Supreme Use & Care Guide for additional model-specific instructions.
Keurig Plus and 2.0 Series
These brewers use an LCD touchscreen.
Keurig instructs users to tap the Power Icon in the lower-right corner of the LCD screen once.
Do not assume that every model has a separate physical Power Button.
The following table summarizes the differences.
| Keurig Model | How to Power It On |
|---|---|
| K-Classic | Press the dedicated Power Button |
| K-Mini Plus | Press the Power Button |
| K-Supreme | Lift and lower the handle |
| Plus / 2.0 Series | Tap the Power Icon on the LCD screen |
These are examples, not a complete list of every Keurig model. Always check the instructions for your exact brewer.
5. Check the Auto Off and Energy-Saving Settings
Have you noticed that your Keurig works normally but turns itself off after sitting unused?
This may be normal behavior rather than an electrical problem.
Some Keurig models have automatic shutoff features to save energy. Once the brewer has been idle for a certain amount of time, it turns off automatically.
The time depends on the model.
| Keurig Model | Documented Auto Off Behavior |
|---|---|
| K-Mini Plus | 90 seconds after the last brew |
| K-Supreme | 5 minutes after the last brew |
| Older K55 Elite | 2 hours after the last brew when Auto Off is enabled |
For example, the K-Mini Plus automatically shuts off after 90 seconds. You can press its Power Button to start it again.
The K-Supreme also has an automatic shutoff feature, but its documented timing is different.
If you own an older K55 Elite, check whether its Auto Off feature is enabled.
You can review the Keurig official product information and settings guidance for additional details.
Remember: Auto Off should not be confused with a machine that loses power during brewing or fails to respond at all.
If your Keurig repeatedly shuts off while making coffee, do not assume that its energy-saving setting is responsible. Further troubleshooting or professional assistance may be necessary.
6. Restart Your Keurig After a Power Outage
Did your Keurig stop working after a power outage?
A sudden interruption in the electrical supply may leave the brewer in an unfinished operating state.
Before assuming that something has failed internally, try a basic restart.
What to do:
- Turn off the brewer if its controls respond.
- Make sure the power cord and surrounding area are completely dry.
- Unplug the Keurig from the wall outlet.
- Leave it disconnected for about one minute.
- Check that the outlet is working.
- Reconnect the brewer to a compatible outlet.
- Use the normal startup procedure for your model.
Allow the machine to complete its normal startup process.
If your model has a display, check whether it shows an error or warning message.
Some older Keurig models also have specific recovery instructions after losing power during a brewing cycle. For example, certain models use a handle-lifting and lowering procedure.
Do not use a random factory-reset combination found online. The correct procedure depends on your brewer.
If the machine still has no lights or response, contact Keurig Support rather than repeatedly unplugging and reconnecting it.
7. Let Your Keurig Warm Up After Cold Storage
This problem is easy to overlook, especially if you have stored your coffee maker in a garage, basement, or another cold location.
Very low temperatures can affect the water inside a Keurig. If the brewer has been exposed to freezing conditions, the water may freeze, and the machine may not operate normally.
Keurig advises allowing a brewer exposed to below-freezing temperatures to return to room temperature for at least two hours before brewing.
Here’s what to do:
- Stop trying to operate the cold brewer.
- Move it to a dry room with normal indoor temperature.
- Allow it to warm up for at least two hours.
- Check the power cord and machine for visible damage.
- Follow your model’s storage and startup instructions before using it again.
Do not use a hair dryer, heater, or hot water to warm the machine quickly.
Also, do not force a brewing cycle while the brewer may still be frozen.
You can read Keurig’s official instructions for draining and storing a brewer for more information about cold storage.
8. Check for a Possible Internal Electrical Problem
If you have checked the power cord, outlet, circuit breaker, and startup controls but your Keurig still will not turn on, an internal problem may be responsible.
Possible issues include:
- A damaged internal electrical connection.
- A failed control board.
- A faulty power-related component.
- Damage caused by an electrical surge.
- A problem involving the heating or control system.
However, you cannot identify the exact failed part simply because the machine has no power.
Watch for these warning signs:
- A burning electrical smell.
- Smoke or visible sparks.
- A melted or discoloured plug.
- A damaged power cord.
- Repeatedly tripping household electrical protection.
- Water entering the electrical area.
Stop using the brewer if you notice any of these signs.
Disconnect the power only when it is safe to do so. Never touch a wet plug or outlet.
Do not remove the outer cover or attempt to inspect internal wiring. Keurig brewers contain electrical and heating components that can be dangerous to handle without proper training.
At this point, contact Keurig Customer Support or a qualified appliance service professional.
Keurig Won’t Turn On After Descaling or Cleaning
Did your Keurig stop responding after you cleaned or descaled it?
This situation can be confusing because the machine was working before you started maintenance.
However, a descaling problem and a complete loss of electrical power are not necessarily the same thing.
Descaling mainly deals with mineral deposits inside the water system. It does not normally require you to reset the electrical controls using an unfamiliar button combination.
First, check what the machine is doing.
If the display and lights are completely off:
- Check the power cord.
- Test the outlet.
- Check the GFCI or circuit breaker.
- Use the correct startup procedure for your model.
Do not keep repeating the descaling process when the machine is not receiving power.
If the machine has power but the Descale Light stays on:
The descaling cycle may not have been completed correctly. Some models require a specific cleaning and fresh-water rinse procedure before the warning disappears.
Read our detailed guide on Keurig Descale Light Won’t Turn Off? 7 Fixes to Try for model-specific guidance.
If water entered the controls or electrical connection during cleaning:
Stop using the brewer. Do not reconnect it until the situation has been checked by someone qualified to handle the electrical risk.
One more thing: always unplug your Keurig before cleaning or removing parts, and follow the cleaning instructions for your particular model.
Keurig Won’t Turn On but the Outlet Works: What Does It Mean?
You have tested the wall outlet with another appliance, and it works normally. However, the Keurig remains completely unresponsive.
What should you do?
Start by checking these possibilities.
| What to Check | Why It Matters |
|---|---|
| Power cord connection | A loose or damaged connection may prevent startup |
| Correct power button | Different models use different startup controls |
| Voltage rating | An incompatible electrical supply can prevent safe operation or cause damage |
| Auto Off settings | The brewer may have switched itself off normally |
| Previous electrical interruption | A power outage may have interrupted normal operation |
If everything appears correct but the machine still has no power, an internal fault becomes more likely.
Keurig’s official support instructions recommend checking the plug, testing the outlet, trying another kitchen outlet, and using the correct Power Button or LCD Power Icon.
You can follow the manufacturer’s official troubleshooting instructions for a brewer that will not power on.
If those checks do not solve the problem, contact Keurig Support with your model and serial number available.
When Should You Contact Keurig Customer Support?
You do not need to keep testing the same things when the simple checks have failed.
Some problems require manufacturer support or a qualified technician.
Here is when to stop troubleshooting.
| Problem | Recommended Action |
|---|---|
| Outlet does not work | Contact an electrician |
| Damaged power cord or plug | Stop using the machine and arrange proper service |
| Breaker or RCD repeatedly trips | Contact a qualified electrician |
| Burning smell or sparks | Stop using the brewer immediately |
| No power after all basic checks | Contact Keurig Support |
| Suspected internal electrical fault | Request professional service |
Before contacting support, prepare the following information:
- Your Keurig model name.
- The serial number.
- Approximate purchase date.
- A description of what happens when you try to turn it on.
- Any warning lights or unusual sounds you noticed before the problem started.
This information can help the support team identify the correct troubleshooting instructions.
Also, check your warranty documents before paying for a repair or replacing the brewer.
Warranty coverage can depend on the model, purchase location, and other terms.
How to Prevent Your Keurig from Losing Power Again
You cannot prevent every electrical problem, but a few simple habits can reduce avoidable trouble.
Use a suitable electrical outlet.
Follow the grounding and electrical requirements in your Keurig manual. Avoid overloaded circuits and unsuitable power connections.
Check the power cord regularly.
Look for cuts, exposed wiring, melted areas, or loose connections. Stop using the machine if the cord is damaged.
Keep the brewer away from water spills.
Do not allow water to collect near the power cord, plug, or electrical outlet.
Unplug the machine before cleaning.
This reduces the chance of accidentally activating the brewer while handling its removable parts.
Store your Keurig in a frost-free location.
Avoid leaving it in an area where water inside the brewer could freeze.
Follow the correct maintenance instructions.
Clean and descale the machine as recommended for your model. Use the proper procedure rather than guessing which buttons to press.
Pay attention to unusual behavior.
If your Keurig starts switching off during brewing, trips electrical protection, or produces a burning smell, stop using it and investigate safely.
Frequently Asked Questions
1. Why Won’t My Keurig Turn On When Plugged In?
Your Keurig may not turn on because of a loose power connection, faulty wall outlet, tripped circuit breaker, incorrect startup procedure, or internal electrical problem. First, test the outlet with another appliance and check that the brewer is connected correctly. If it remains unresponsive, contact Keurig Support.
2. Why Does My Keurig Have No Lights?
If your Keurig has no lights, it may not be receiving electrical power. Check the plug, outlet, and circuit breaker. Also, remember that indicator lights behave differently across Keurig models. Refer to your specific user manual before deciding that the machine has failed.
3. How Do I Reset a Keurig That Won’t Turn On?
For a basic restart, turn off the brewer if possible, unplug it for about one minute, and reconnect it to a suitable working outlet. Then follow the startup instructions for your model. This is a basic power cycle, not a factory reset. Keurig models do not all use the same reset procedure.
4. Why Won’t My Keurig Turn On After a Power Outage?
A power outage may interrupt the brewer’s normal operation or affect the household electrical supply. Check whether the outlet and circuit breaker are working. Once power is restored, try a basic restart and follow your model’s instructions. If the brewer remains completely unresponsive, contact support.
5. Can Descaling Cause a Keurig Not to Turn On?
Descaling does not normally mean the machine has suffered an electrical failure. However, if your Keurig stops responding afterward, check the power supply first. If the display still works but the Descale Light remains on, the problem may involve an incomplete descaling or rinse procedure.
6. Why Does My Keurig Turn Off by Itself?
Some Keurig models have an Auto Off feature that shuts down the brewer after a period of inactivity. The timing depends on the model. For example, the K-Mini Plus shuts off after 90 seconds, while the K-Supreme shuts off after five minutes. Check your user guide to confirm the correct setting.
7. Why Is My Keurig Screen Blank?
A blank Keurig screen can indicate a power supply problem, loose connection, or possible display or internal control fault. Check the electrical outlet and power connection first. If your Plus or 2.0 model remains blank after these checks, contact Keurig Support.
8. Is My Keurig Dead If It Won’t Turn On?
Not necessarily. A faulty wall outlet, tripped GFCI, loose plug, or incorrect power-on procedure can make a working machine appear dead. Check these simple causes before considering replacement. If none of them explains the problem, professional assessment can help determine whether repair or replacement makes more sense.
9. Should I Repair or Replace a Keurig That Has No Power?
It depends on the machine’s age, warranty status, repair cost, and the cause of the failure. Check the warranty first. A simple electrical supply issue may cost nothing to correct, while an internal fault may require professional service. Compare the repair estimate with the cost of a suitable replacement before deciding.
Final Thoughts
A Keurig that won’t turn on can be frustrating, but it does not automatically mean you need a new coffee maker.
Start with the power cord, wall outlet, and circuit breaker. Then check the correct startup procedure and Auto Off settings for your model.
If your brewer stopped working after a power outage or cold storage, follow the relevant manufacturer instructions before trying another brew cycle.
Most importantly, do not open the machine or attempt to repair internal electrical components yourself.
When the basic checks do not restore power, contact Keurig Support or a qualified service professional.
A careful diagnosis is better than guessing. It can help you avoid unnecessary replacement costs and, more importantly, keep your kitchen safe.

“I believe great cooking starts with the right tools, trusted advice, and a little confidence in the kitchen.”
Hi, I’m Emma Carter. My love for cooking began in my grandmother’s kitchen, where I learned that every great meal starts with simple ingredients and the right cookware. Over the years, I’ve spent countless hours researching, testing, and comparing kitchen appliances, cookware, coffee makers, air fryers, and other everyday kitchen essentials.
Here at KiCook, my goal is to make your buying decisions easier with honest product reviews, practical buying guides, and easy-to-follow cooking tips. Whether you’re upgrading your kitchen or searching for the best appliance for your home, I focus on providing clear, reliable, and research-backed information you can trust.
When I’m not testing new kitchen gadgets or writing in-depth guides, you’ll usually find me trying new recipes, visiting local farmers’ markets, or enjoying a quiet cup of coffee while planning my next kitchen project.