

Learn the quick and easy way to line a baking pan with parchment paper for mess-free treats every time—no more sticking or scrubbing!
Flashback: The first time I tried to line a cake pan, my parchment paper came out looking like a crumpled origami fail—complete with mysterious burn marks.
Fast-forward years and many (many) lopsided brownies later, and I’ve developed my own set of quirky but effective parchment-lining rituals. If you’ve ever battled with sticky cakes, awkward pan corners, or the eternal question—does it really matter HOW you line that baking sheet?—you’re not alone.
Here’s how I tamed the parchment beast, with tips for both the patient and the perpetually clumsy.
“Parchment paper is the unsung hero of baking—no sticking, no scrubbing, just perfect results.” – Mary Berry
Confessions from the Trenches: My Most Memorable Parchment Paper Fails
Let’s be honest: lining a baking pan with parchment paper sounds simple—until you’re elbow-deep in flour, wrestling with a crumpled sheet, and questioning your life choices. I’ve been there more times than I care to admit.
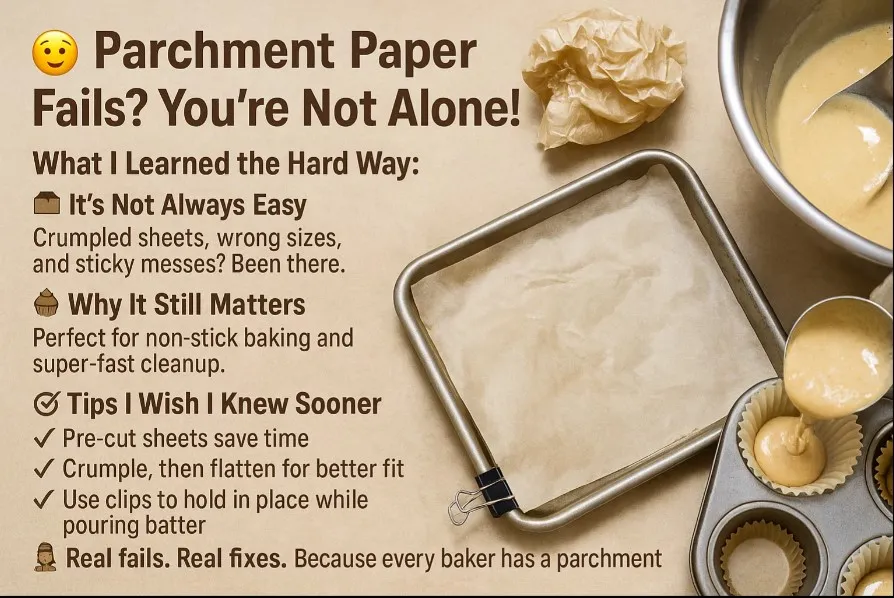
While parchment paper is a game-changer for non-stick baking and easy cleanup, my journey to mastering this humble kitchen staple has been paved with sticky, crumby, and sometimes hilarious missteps. Here’s a peek into my not-so-perfect baking pan adventures, and what I’ve learned along the way.
When “Winging It” Went Wrong: Cookies Fused to the Baking Sheet
There was a time I thought I could just toss a piece of parchment paper onto the baking pan and call it a day. No measuring, no trimming, no fuss. I figured as long as the cookies weren’t directly on the metal, I was golden.
Turns out, “winging it” with parchment paper is a gamble. The paper shifted, crumpled, and left half my batch of chocolate chip cookies welded to the bare baking sheet. Not exactly the non-stick magic I’d hoped for.
Research shows that parchment paper creates a reliable non-stick surface, but only if it’s properly fitted to the baking pan. If the paper is too small or slides around, you risk sticky disasters and uneven bakes.
Now, I always make sure the parchment covers the entire pan, with a bit of overhang for easy lifting. It’s a simple baking tip, but it took a few fused-cookie fiascos to learn it.
The Too-Short Parchment Paper: A Gluey Cake Pan Disaster
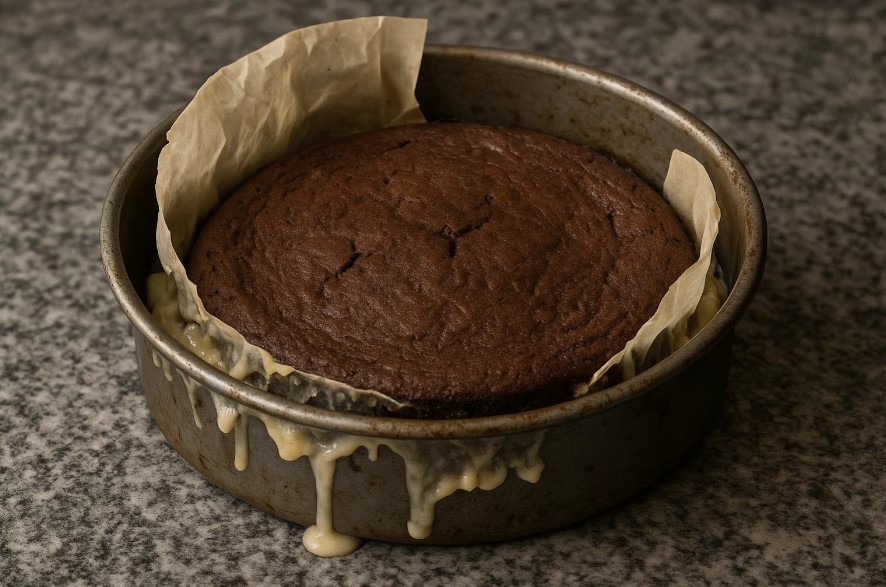
Another memorable fail? The time I tried to line a cake pan with a scrap of parchment that was just a little too short. I thought, “It’ll be fine. What’s the worst that could happen?” Well, the cake batter oozed under the edges, baking into a sticky, gluey mess that clung to the pan like cement. I spent more time chiseling cake out of the corners than actually enjoying it.
Studies indicate that parchment paper should go most of the way up the sides of the pan to prevent spillage and ensure easy removal. Trimming your parchment to fit—whether you’re using the pinch-and-fold method for square pans or cutting a circle for round ones—makes all the difference. I’ve learned to never underestimate the importance of a well-lined pan, even if it means grabbing a fresh sheet of parchment instead of making do with leftovers.
The Accidental Origami: Invented Methods, Some Successful, Others… Less So
In my quest for the perfect fit, I’ve tried every parchment paper hack out there. Sometimes, I get creative—maybe a little too creative. There was the time I attempted an “origami” method, folding and creasing the parchment to fit a loaf pan with sharp corners.
The result? A patchwork of paper flaps that looked impressive but leaked batter in every direction. Other times, I’ve cut slits at the corners, only to end up with jagged edges and awkward overlaps.
Research-backed baking tips suggest that the origami method works best for straight-sided pans with crisp corners. For pans with rounded or angled sides, simple folding and trimming is more reliable. I’ve learned that lining pans is rarely perfect, but always fixable. If the parchment doesn’t sit flat, a little grease under the paper helps it stick. If there’s excess, I just trim it away. And if I mess up? Well, that’s what spatulas are for.
Foil vs. Parchment: The Great Debate
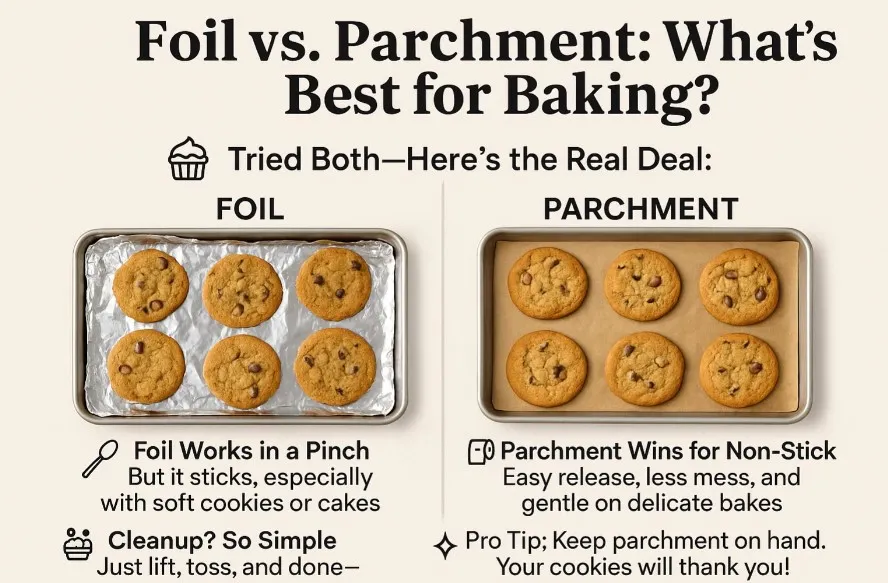
Of course, there’s always the temptation to swap parchment paper for foil, especially when you’re out of supplies. I’ve tried it, and while foil can work in a pinch, it doesn’t offer the same non-stick benefits or easy release. Parchment paper is simply better for delicate cakes, cookies, and anything prone to sticking. Plus, cleanup is a breeze—just lift out the paper and toss it.
‘Perfection isn’t a prerequisite for great cake—just a willingness to learn with each bake.’ – Samin Nosrat
Every baking pan mishap has taught me something new. From cookies glued to the sheet to cakes stuck in the pan, I’ve learned that trial and error is part of the process. Embracing imperfection—and a little parchment paper wisdom—makes baking less stressful and a lot more fun. If you’re ever in doubt, remember: even the quirkiest ritual can lead to a better bake next time.
How I Tame Any Shape: Parchment Paper Adventures for Every Pan
When it comes to baking pan preparation, I have a bit of a reputation for being, well, quirky. My friends joke that I treat lining a baking pan with parchment paper like a sacred ritual. But honestly, once you’ve wrestled with a stubborn cake pan or tried to pry brownies out of a square pan without the right liner, you start to appreciate the art of a snug parchment fit.
Over the years, I’ve picked up a handful of kitchen hacks—some classic, some a little odd—that make lining any pan, from a loaf pan to a rebel-shaped casserole dish, a breeze. Let’s dive into my parchment paper adventures.
Square Pan Origami: Pinch, Fold, and Cradle
Let’s start with the classic square pan. If you’ve ever tried to line a square pan with a flat sheet of baking paper, you know the struggle: crumpled corners, awkward overlaps, and batter sneaking underneath. My go-to method? A little origami magic.
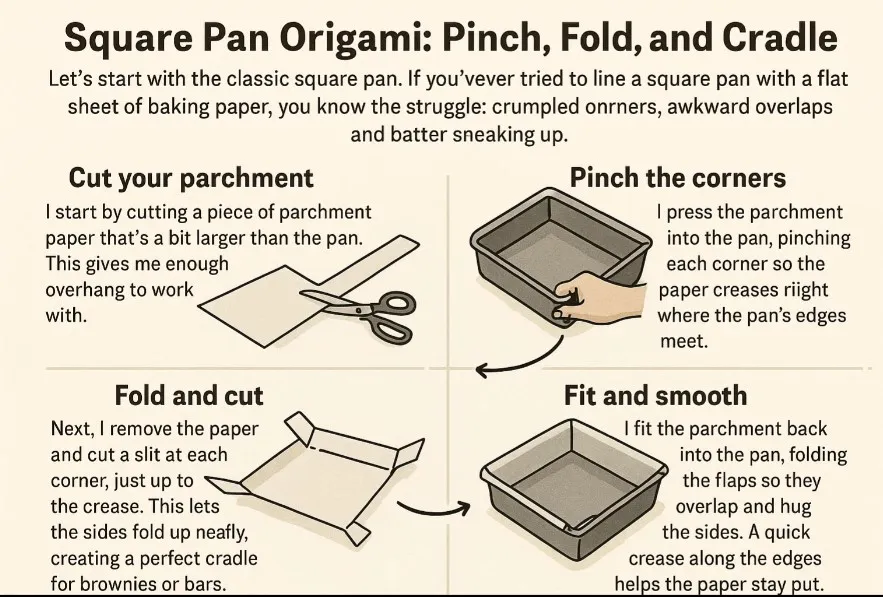
Here’s how I do it:
- Cut your parchment: I start by cutting a piece of parchment paper that’s a bit larger than the pan. This gives me enough overhang to work with.
- Pinch the corners: I press the parchment into the pan, pinching each corner so the paper creases right where the pan’s edges meet.
- Fold and cut: Next, I remove the paper and cut a slit at each corner, just up to the crease. This lets the sides fold up neatly, creating a perfect cradle for brownies or bars.
- Fit and smooth: I fit the parchment back into the pan, folding the flaps so they overlap and hug the sides. A quick crease along the edges helps the paper stay put.
This folding and trimming technique makes for a snug fit, and research shows that the origami method is especially effective for straight-sided pans. As Erin Jeanne McDowell says,
‘Origami methods are best for straight-edged pans, but the real trick is patience—and a willingness to improvise.’
And she’s right. Sometimes, I have to tweak the folds or trim a little extra, but the result is always worth it: a square pan lined like a pro, ready for anything.
The Round Cake Pan Cheat: Trace and Snip
Round cake pans can be tricky, but I have a simple kitchen hack that never fails. Instead of trying to force a square sheet into a round pan, I trace the base of the cake pan directly onto the parchment paper. Here’s my process:
- Trace: Place the cake pan on the parchment and use a pencil to trace around the bottom.
- Cut: Cut out the circle, staying just inside the line for a snug fit.
- Fit: Drop the parchment circle into the pan. If I want extra insurance, I’ll also cut a long strip to line the sides, letting it overlap slightly.
Studies indicate that for round cake pans, parchment is typically used only on the bottom, while greasing the sides prevents sticking. Still, I sometimes let the baking paper go up the sides for easy removal, especially with delicate cakes.
Loaf Pan Rescue: Overhang Handles for the Win
Loaf pans are notorious for trapping banana bread or pound cake at the bottom. My solution? Double up the parchment and let the excess hang over the long sides. This creates sturdy “handles” that make lifting out your baked goods a breeze. Here’s how I line a loaf pan:
- Cut a strip of parchment paper long enough to cover the bottom and two sides, with a generous overhang.
- Press it into the pan, creasing the corners for a snug fit.
- For extra support, I sometimes add a second strip going the other direction, forming a cross.
This method is a lifesaver for sticky batters and ensures your loaf comes out in one piece. Plus, cleanup is a snap.
Rebel Pans: My Kitchen Hack for Angled or Rounded Sides
Not all pans play by the rules. Angled or rounded sides can make lining with parchment paper feel like a puzzle. My kitchen hack? I soften the parchment by scrunching it up into a ball, then smoothing it out. This makes the paper more flexible and easier to mold into tricky corners.
Sometimes, I’ll cut slits along the edges or use multiple overlapping pieces to get full coverage. It’s not always pretty, but it gets the job done—and that’s what matters most in baking pan preparation.
Whether you’re lining a cake pan, square pan, or loaf pan, the right baking paper technique can mean the difference between a stuck disaster and a perfect release. With a little folding, trimming, and a willingness to improvise, you can tame any shape your kitchen throws at you.
Beyond Nonstick: Creative Uses of Parchment Paper
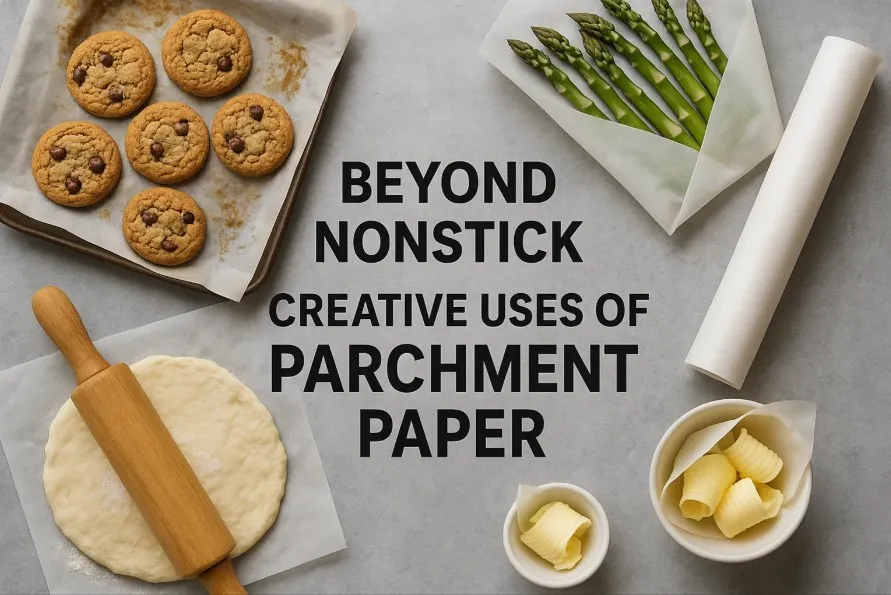
When I first started baking, I thought parchment paper was just a fancy way to keep cookies from sticking to the pan. But over the years, I’ve discovered that this humble kitchen staple is so much more than a nonstick surface. It’s a secret weapon for anyone who loves baking hacks, easy cleanup, and the occasional dramatic dessert reveal.
Let’s go beyond the basics and talk about some creative uses—and a few cautionary tales—when it comes to lining your baking pans with parchment paper.
The ‘Handle’ Hack: Lifting Brownies and Cakes Like a Pro
One of my favorite kitchen hacks involves using parchment paper to create makeshift handles. Here’s how it works: instead of trimming the parchment paper to fit perfectly inside your baking pan, let it overhang on two sides. When your brownies or bars are done, you simply grab the edges and lift the entire slab out in one smooth motion.
No more digging around the edges with a spatula and risking a crumbly mess. This trick is a game-changer for anyone who wants clean, even squares every time. Research shows that excess parchment paper forms these handy ‘handles’ for easy removal, making it a must-try for your next baking project.
It’s not just about convenience, either. Using parchment paper as a baking pan handle also helps protect delicate cakes and bars from breaking apart. I’ve even used this method for dramatic cake reveals—imagine peeling back the parchment and unveiling a perfectly baked layer, ready for frosting or stacking. It’s a small detail, but it makes a big difference in presentation and confidence.
Saving the Day: Parchment Paper vs. Leaky Batter Fiascos
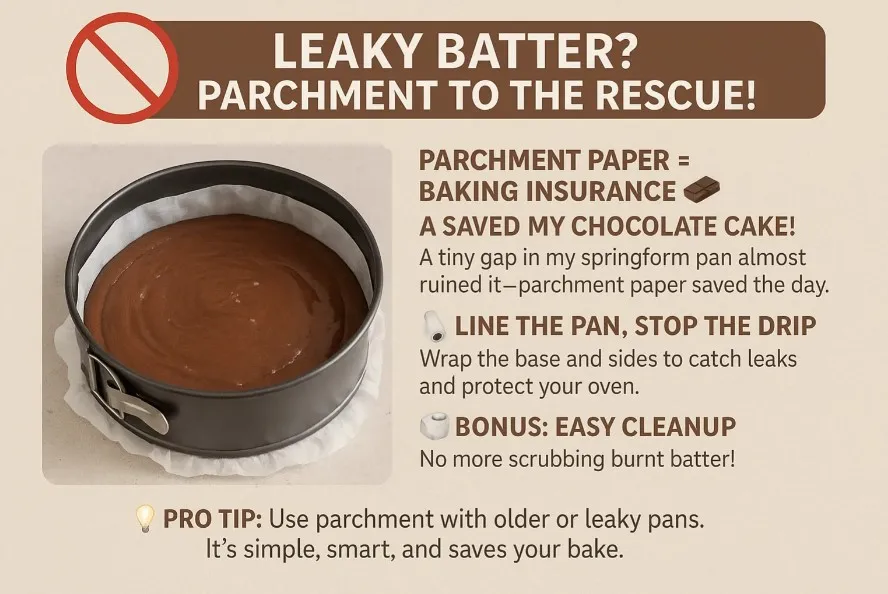
Let me share a quick story. Once, I was making a gooey chocolate cake in a springform pan that, unbeknownst to me, had a tiny gap at the base. As I poured in the batter, I noticed a slow, ominous drip forming underneath. Panic set in. But then I remembered a tip I’d read: parchment paper can act as a waterproof barrier. I quickly lined the bottom and sides of the pan with parchment, making sure it went up and over the edges. The result? No more leaks, and my cake baked up perfectly.
This isn’t just a one-off trick. Studies indicate that parchment paper helps prevent baking pan leakage, especially with thinner batters or older pans that don’t seal tightly. It’s a simple, effective kitchen hack that can save your dessert—and your oven—from a sticky disaster. Plus, cleanup is a breeze, since the parchment catches any stray drips or crumbs.
Improvising Gone Wrong: Wax Paper and Kitchen Towels
Of course, not every experiment in the kitchen goes as planned. There was a time I ran out of parchment paper right before baking a batch of blondies. In a moment of desperation, I reached for wax paper, thinking it might work as a substitute. Spoiler: it didn’t. Wax paper isn’t heat-resistant, and it started to smoke and melt in the oven. Lesson learned.
Another time, I tried lining a pan with a clean kitchen towel, hoping it would at least prevent sticking. Instead, I ended up with a soggy, fabric-printed bottom layer and a ruined dessert. If you take away one thing from my misadventures, let it be this: parchment paper is irreplaceable when it comes to lining baking pans. Wax paper and kitchen towels are not substitutes—trust me on this one.
‘Sometimes the best kitchen hacks come from last-minute panic.’ – Claire Saffitz
So, whether you’re crafting a clever baking pan handle, preventing baking pan leakage, or just looking for reliable baking tips, parchment paper is your best friend in the kitchen. It’s more than a nonstick layer—it’s a tool for creativity, problem-solving, and the occasional bit of kitchen drama. Next time you reach for that roll, remember: a little excess parchment can go a long way, and improvisation is best left for other ingredients. Happy baking!
“A well-lined pan means your cake will slide out like a dream.” – Ina Garten
Frequently Asked Questions For How to Line a Baking Pan with Parchment Paper
Can I reuse parchment paper?
Yes, if it’s not too greasy or torn. Just wipe it clean and reuse it for similar bakes.
Is parchment paper better than foil?
For baking, parchment is best—it doesn’t react with food and promotes even browning.
Can I use parchment paper in an air fryer?
Yes, but trim it to fit so it doesn’t block airflow.
Conclusion
Lining a baking pan with parchment paper is a simple trick that makes baking easier and cleanup faster. Whether you’re a beginner or a seasoned baker, this method ensures perfect results every time.
“Good baking starts with the right prep—parchment paper is a must!” – Paul Hollywood
Now that you know how to line a baking pan with parchment paper, go ahead and bake with confidence. Happy baking!