
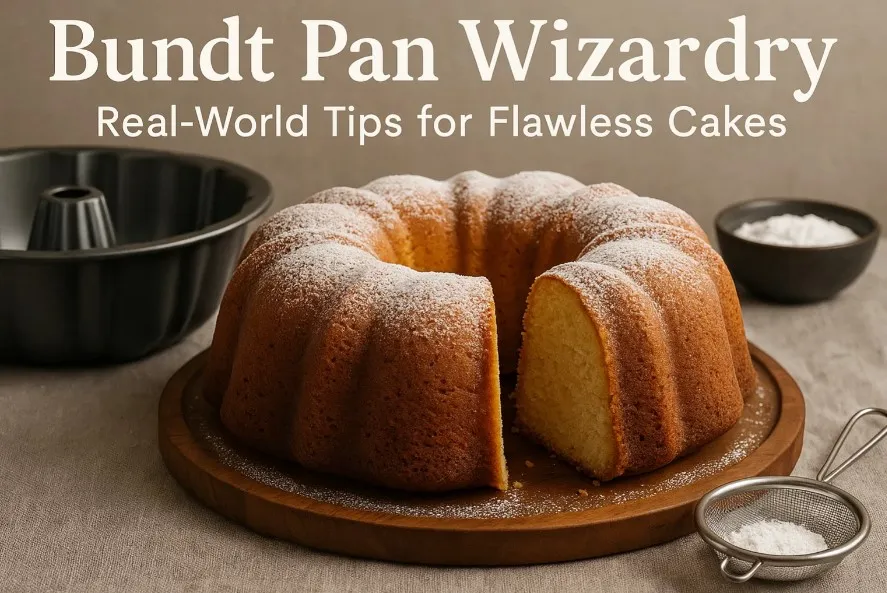
To use a Bundt pan properly, thoroughly grease every nook (use melted butter or baking spray with flour) to ensure easy release, then dust with flour or sugar for extra insurance. Pour batter evenly, bake as directed, and let it cool 10-15 minutes before inverting onto a rack—this helps the cake hold its intricate shape!
I’ll never forget my first bundt pan disaster: what was supposed to be a queenly lemon drizzle emerged in chunks—a beautiful mosaic, if you’re being charitable. Years (and countless pans) later, what I wish I’d had wasn’t just a recipe, but the little, hard-won secrets no box ever mentions. This post is for every baker who’s battled a stubborn cake (or just wants to get it right the first time).
Greasing the Pan: Adventures in Sticking and Slipping
If you’ve ever tried to release a cake from a galese bundt pan and ended up with half of it stuck to the bottom, you know the heartbreak of poor bundt pan preparation. Even the best nonstick pans can betray you.

I’ve learned the hard way that “nonstick” doesn’t always mean what it promises. Sometimes, despite all good intentions, a beautiful cake turns into a patchwork puzzle. That’s why greasing the pan—really greasing it, with intention and care—isn’t just a step. It’s a ritual.
Why Nonstick Isn’t Always Non-Stick: Tales from the Trenches
I can’t count how many times I’ve heard, “But it’s a nonstick pan!” as someone tries to pry out a stubborn bundt. Nonstick coatings wear down, and even a tiny scratch can spell disaster. Research shows that proper greasing is crucial for both cake release and pan longevity. If you want your galese bundt pan to last, and your cakes to come out whole, don’t skip this step—no matter what the label says.
The Ultimate Pan-Greasing Showdown
Let’s talk bundt pan greasing methods. I’ve tried them all: butter, shortening, oil, nonstick spray, even cocoa powder. Here’s what I’ve found:
- Butter: Classic, adds flavor, but can pool if not spread evenly.
- Shortening: Reliable, neutral taste, clings well to intricate designs.
- Oil: Easy to apply, but sometimes too thin for deep crevices.
- Nonstick spray: Convenient, but research and experience both say it often leaves a sticky residue that’s tough to clean.
- Cocoa powder: For chocolate cakes, it’s a game-changer—no more white streaks on that rich, dark crumb.
How to Properly Grease Every Nook with a Pastry Brush
The secret weapon? A pastry brush. Whether you’re using melted butter, oil, or shortening, a pastry brush lets you get into every swirl and ridge of your bundt pan. It matters—miss a spot, and that’s where your cake will stick. After brushing, dust with flour (or cocoa powder for chocolate cakes) and tap out the excess. This double layer is your insurance policy.
Timing Trick: Grease Right Before You Pour in the Batter
Here’s a tip I wish I’d learned sooner: don’t grease your pan at the start of your recipe. If you do, the fat can slide down and pool at the bottom, leaving the sides exposed. Instead, wait until your batter is ready. Grease the pan, dust, and pour in the batter right away. This small timing tweak makes a big difference in the final result.
“Proper pan greasing is the difference between a showstopper and a cake you have to eat straight from the pan.” – Christina Tosi
| Greasing Method | Best For | Common Issues | Chocolate Cake Tip |
|---|---|---|---|
| Butter | Flavor, classic cakes | Pooling, uneven coverage | Use with cocoa powder |
| Shortening | Intricate pans, neutral taste | Can be hard to spread thinly | Pair with cocoa powder |
| Oil | Quick application | Too thin for deep crevices | Combine with cocoa powder |
| Nonstick Spray | Convenience | Sticky residue, hard to clean | Avoid for best results |
| Cocoa Powder | Chocolate cakes | None if used with fat | Prevents white streaks |
Bundt Pan Size & Batter Battles: When More Is Not Merrier
If you’ve ever watched a Bundt cake bubble over in the oven, you know the heartbreak of bundt pan overflow. It’s tempting to pour in every last drop of batter, especially when you’re feeling generous or the recipe looks a little skimpy. But here’s the truth: when it comes to bundt pan size and batter amount, restraint is your best friend.

Research shows that filling your Bundt pan between two-thirds and three-fourths full is the sweet spot for optimal shape and rise. Anything more, and you risk a sticky, sunken mess.
“Knowing your pan’s limits is half the battle; the other half is not being greedy with the batter.” – Mary Berry
Bundt Pan Overflow: Why Filling 2/3 to 3/4 Full Is the Real MVP
Bundt pans are notorious for their intricate designs, but those deep grooves and curves need room for the cake to expand. If you overfill, the batter will spill over the sides, leading to burnt edges and uneven baking.
On the flip side, underfilling can leave you with a squat, disappointing cake. I always aim for that two-thirds to three-fourths mark. It’s not just about looks—this range helps prevent cake sinking and ensures the center cooks through.
Recipe Math: Doubling Loaf Cakes for Typical Bundt Pans

Here’s a tip I wish I’d learned sooner: most classic Bundt pans hold 10 to 12 cups of batter. If you’re converting a standard loaf cake recipe, you’ll usually need to double it to fill a Bundt pan properly. It sounds tricky, but it’s really just simple math. And when it comes to bundt cake baking time, a good rule of thumb is to budget about one minute per ounce of batter at 350°F (180°C).
So, if your pan holds 12 cups (about 96 ounces), you’re looking at roughly 90–100 minutes of baking time. Always check for doneness with a skewer or cake tester, as oven performance can vary.
Shopping Sprees and Secondhand Gems: How to Pick Pan Size Without Mystery and Regret
Whether you’re buying new or scoring a vintage find at a thrift store, knowing your bundt pan size is crucial. Look for the capacity stamped on the bottom, or measure it yourself by filling the pan with water and counting the cups.
Stick with the classic 10- to 12-cup size for most recipes, unless you’re after mini Bundts or a showstopper. And don’t forget—nonstick pans in good condition are your best bet for easy release and beautiful detail. Scratched or worn pans can cause sticking, so inspect before you invest.
| Bundt Pan Size | Typical Fill (Batter Amount) | Baking Time at 350°F (180°C) |
|---|---|---|
| 10-cup | 6.5–7.5 cups (2/3–3/4 full) | 60–70 minutes |
| 12-cup | 8–9 cups (2/3–3/4 full) | 75–90 minutes |
Remember, bundt pan preparation is just as important as batter math. Grease every nook and cranny right before baking, and dust with flour or cocoa powder for best release. Place your Bundt pan on a sheet pan to catch any stray drips, and let the cake cool for 10–15 minutes before flipping. These little steps make all the difference between Bundt cake glory and a kitchen disaster.
Saving Your Cake: Cooling, Removal, and the Art of Patience
There’s a moment in every Bundt cake adventure that tests your nerves: the wait between oven and unveiling. I’ve learned—sometimes the hard way—that mastering bundt cake cooling and removal is just as important as nailing the batter. If you want a flawless finish, patience is your secret ingredient.
Why Letting the Cake ‘Rest’ for 10–15 Minutes Saves Your Masterpiece
It’s tempting to flip your cake out of the pan the second it’s done. I get it—the aroma is irresistible! But research shows that letting your cake cool in the pan for 10 to 15 minutes is crucial. This short rest allows the cake to firm up, making it less likely to stick or break apart. The structure sets, and the steam inside helps gently loosen the edges from the pan. As Duff Goldman wisely puts it:
“Letting your Bundt cake cool is like letting paint dry—skip it, and you’ll never forgive yourself.”
So, resist the urge. Set a timer. Trust me, your patience will pay off.
Venturing Into the Flip: The Wild (But Satisfying) Moment of Truth
Once those 10–15 minutes are up, it’s time for the big reveal. Here’s where bundt cake removal gets real. I always place my Bundt pan on a baking sheet before flipping—this simple bundt pan tip catches any drips and keeps the pan steady.
When you’re ready, gently run a thin spatula or butter knife around the edges and center tube. Don’t force it—if the cake resists, try a gentle tap-tap-tap on the pan or a little “hug” around the sides. Sometimes, a few seconds upside-down is all it takes for gravity to do its work.
- Let cake cool in pan for 10–15 minutes
- Loosen edges with a thin spatula if needed
- Invert onto a wire rack or plate, using gentle taps
- Never force—patience and a light touch are key
Cake Fails and Fixes: What to Do If Disaster Strikes
Even with the best bundt pan preparation, things can go sideways. Maybe a chunk sticks, or the whole cake splits. Don’t panic!

First, see if you can piece it back together—icing covers a multitude of sins. If not, embrace the imperfection. I’ve turned many a Bundt mishap into a gorgeous trifle: just layer the broken cake with whipped cream and fruit. No one will be the wiser, and you’ll still have a delicious dessert.
Remember, every baker has a story about a Bundt cake that didn’t quite make it out in one piece. The key is to learn from each attempt. Proper cooling, gentle handling, and a well-prepared pan are your best defenses. And if all else fails, there’s always plan B (and maybe a little extra whipped cream).
Bundt Pan TLC: Cleaning, Storage, and Avoiding Rookie Mistakes
When it comes to baking with a nonstick bundt pan, I’ve learned that the secret to flawless cakes isn’t just in the recipe—it’s in how you treat your pan. Bundt pan care is a bit of an art, and honestly, there are a few things I wish someone had told me before my first cake stuck like glue.

Let’s talk about the real-world tips for bundt pan cleaning, storage, and the rookie mistakes that can turn a showstopper into a disaster.
First, let’s tackle cleaning. Most boxes will tell you that nonstick pans are easy to clean, but the reality is a little more nuanced. Aerosol cooking sprays, for example, seem convenient but often leave a sticky residue that’s tough to remove. I’ve found it’s best to skip the spray and instead use melted butter or oil, brushing it into every nook and cranny. This not only helps with release but makes bundt pan cleaning much simpler. If you do find residue building up, a gentle hand wash with mild soap is your friend.
Avoid abrasive pads at all costs—they’ll scratch the nonstick surface, and that’s where bundt pan mistakes start to snowball.
Speaking of scratches, let’s talk about why they’re your cake’s nemesis. Even the best nonstick bundt pan can betray you if it’s scratched. Those tiny grooves are perfect for batter to cling to, and no amount of greasing will save you once the damage is done. Research shows that pan condition and cleaning routine directly impact how easily your cakes release.
So, before every bake, I give my pan a quick inspection. If I spot any significant scratches or worn spots, it might be time to retire it. Nonstick pans work best when they’re in good condition, and clinging to an old, battered pan is a recipe for disappointment.
Storage is another area where bundt pan care can make or break your next bake. I used to stack my pans to save space, but I quickly learned that this can lead to scratches and dents.
Now, I store my nonstick bundt pan on its own, or if I have to stack, I slip a soft cloth or paper towel between pans. And after baking, I never cover my cakes with heavy lids or wraps—this traps condensation, making the cake soggy and undoing all my hard work.
When should you say goodbye to a beloved pan? If the nonstick coating is flaking or the pan is warped, it’s time for a new one. It’s tempting to hold onto a favorite, but bundt pan quality really does matter for consistent results. As Erin McDowell puts it,
“The life of a bundt pan is full of twists—just like your cakes.”
That’s a reminder that a little extra care can keep your pan (and your cakes) in top shape for years to come.
In the end, the best bundt pan care comes down to respect: respect for the pan, the process, and the little details that make all the difference. Keep your pan clean, inspect it regularly, and store it with care. Your future cakes will thank you—and you’ll spend a lot less time prying cake out of crevices.
Bundt pans are magical—when you use the right greasing, timing, and tricks. Brush every crevice, cool before flipping, never fill too high, and keep your pan in top shape. Sometimes, the right shortcut is a lifesaver!
Frequently Asked Questions (FAQs) How to use a bundt pan properly?
1. Can I use cooking spray on a Bundt pan?
Yes, but flour-based sprays (like Baker’s Joy) work best. Avoid plain oil sprays, which can cause sticking.
2. Why did my cake stick to the pan?
You may not have greased it well enough, or the cake wasn’t cooled slightly before flipping.
3. Can I make a regular cake in a Bundt pan?
Yes, but thicker batters work best. Adjust baking time as needed.
4. How do I clean a Bundt pan?
Use warm soapy water and a soft brush to reach all grooves. Avoid harsh scrubbers.
5. Can I freeze a Bundt cake?
Absolutely! Wrap it tightly in plastic and freeze for up to 3 months.
Pro Tips for Perfect Bundt Cakes
✔ Use cake goop (equal parts flour, oil, and shortening) for foolproof greasing.
✔ Tap the pan before baking to remove air bubbles.
✔ Let the cake cool upside down to help it release naturally.
“Baking is a science, but even science can use a little butter.” – Ina Garten
Conclusion
Learning how to use a Bundt pan properly means you’ll get beautiful, perfectly shaped cakes every time. By greasing well, using the right batter, and allowing proper cooling time, you can avoid common pitfalls and impress everyone with your baking skills.
Now that you know the secrets, grab your Bundt pan and start baking! Have any tips of your own? Share them in the comments below!