
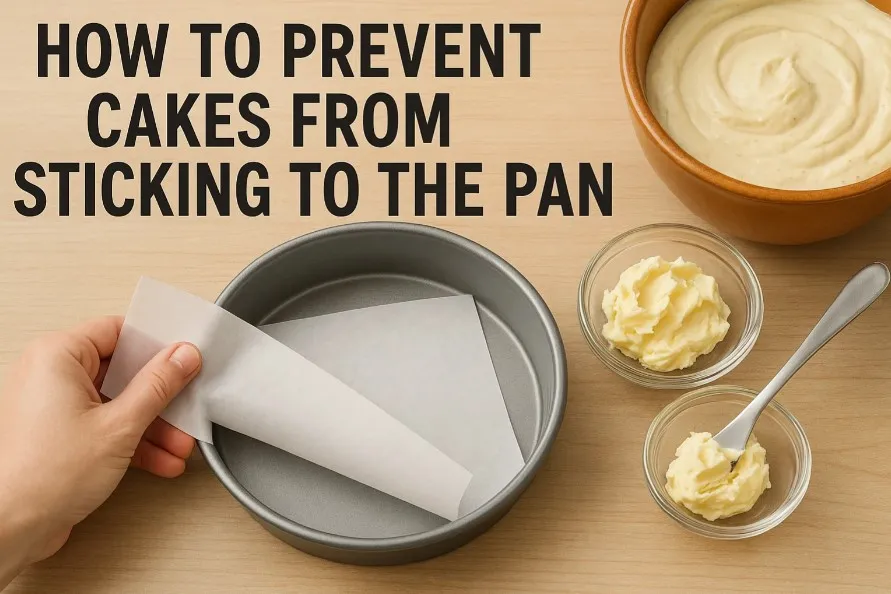
Have you ever baked a cake, only to have it stubbornly stick to the pan? I know how frustrating that can be. If you’re wondering how to prevent cakes from sticking to the pan, it’s all about proper preparation.
Grease the pan thoroughly, add a light dusting of flour, or line it with parchment paper. These simple steps can make all the difference. Trust me, once you master how to prevent cakes from sticking to the pan, baking becomes so much more enjoyable!
Core Messages
- Always grease the pan evenly with butter or oil to prevent sticking. Pay special attention to corners and edges.
- Use parchment paper for a foolproof release. Cut it to fit the pan and press it down firmly for best results.
- Let the cake cool in the pan for about 10 minutes before removing it. This helps avoid crumbling and sticking.
Why Cakes Stick To The Pan
Common Causes Of Sticking
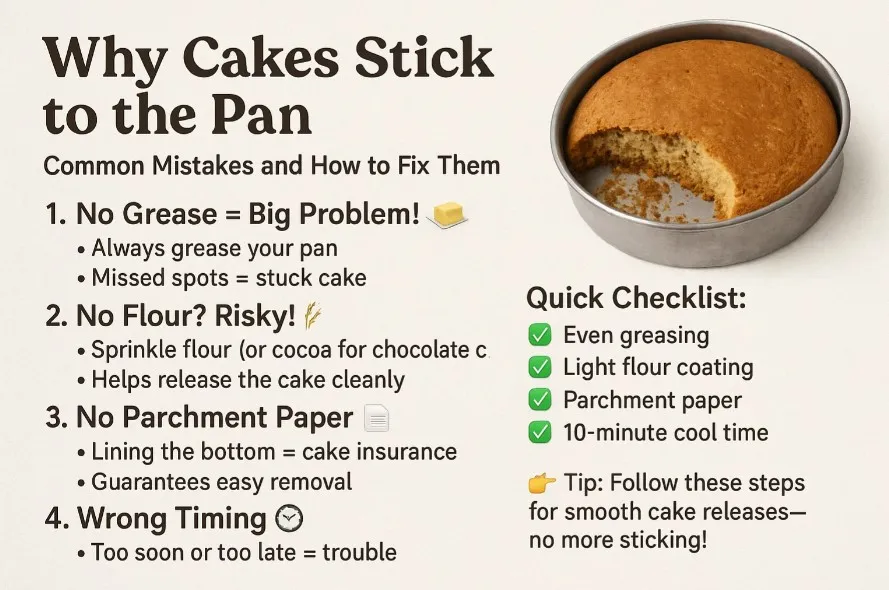
Let’s face it—cake sticking to the pan is a baker’s nightmare. But why does it happen? It usually boils down to a few common mistakes. First, skipping proper pan preparation is a big one. If you don’t grease and flour the pan, the batter clings to the surface like glue. Another culprit is uneven greasing. If you miss a spot, that’s where the cake will stick.
Timing also plays a role. Removing the cake too soon or letting it cool too long in the pan can cause sticking. I’ve learned that cooling the cake for about 10 minutes strikes the perfect balance. Lastly, skipping parchment paper is risky. It’s like insurance for your cake—it guarantees a clean release every time.
Here’s a quick checklist to avoid sticking:
- Grease the pan evenly with butter or oil.
- Sprinkle flour or cocoa powder for chocolate cakes.
- Line the bottom with parchment paper.
- Cool the cake for 10 minutes before removing.
How Pan Type And Ingredients Contribute To Sticking
The type of pan you use matters more than you think. Non-stick pans sound great, but they’re not foolproof. If the coating wears off, cakes will stick. Glass and ceramic pans can be tricky too. They don’t conduct heat as evenly, which can lead to uneven baking and sticking.
Ingredients play their part as well. High sugar content in the batter can caramelize and stick to the pan. Sticky ingredients like honey or molasses make things worse. That’s why greasing and flouring are so important—they create a barrier between the batter and the pan.
If you’re wondering how to prevent cakes from sticking to the pan, start by choosing the right pan and preparing it properly. Trust me, it makes all the difference.
How To Prevent Cakes From Sticking To The Pan
Greasing The Pan: Butter, Oil, Or Non-Stick Spray
Greasing the pan is the first step to ensuring your cake doesn’t stick. I’ve tried butter, oil, and non-stick spray, and honestly, they all work well if applied properly. Butter adds a rich flavor and creates a golden crust, which I love for pound cakes. Oil is a great option for neutral flavors, and non-stick spray is super convenient when you’re in a hurry.
Here’s what I do: I grab a pastry brush or a paper towel and spread the grease evenly across the entire pan. Don’t forget the corners and edges—they’re the trouble spots where cakes often stick. If you’re using a Bundt pan, pay extra attention to all those little crevices.
Want a quick tip? Use softened butter instead of melted butter. It’s easier to control and won’t pool at the bottom of the pan. Trust me, this small change makes a big difference.
Flouring The Pan: Creating A Protective Barrier
Flouring the pan is like adding an extra layer of insurance. After greasing, I sprinkle a light dusting of flour over the surface. Then, I tilt and tap the pan to spread it evenly. This creates a protective barrier between the batter and the pan, which is exactly what you need to prevent sticking.
Either will provide a barrier between batter and pan — which is what you’re seeking.
For chocolate cakes, I swap out flour for cocoa powder. It blends better with the batter and avoids leaving white streaks on the cake. If you’re using flour, make sure to shake out the excess. Too much flour can create a crusty texture on the outside of your cake.
Using Parchment Paper: Proper Placement And Benefits
Parchment paper is my go-to solution for a foolproof cake release. I cut a circle to fit the bottom of the pan and press it down firmly. For square or rectangular pans, I cut the paper to fit and leave a little overhang on the sides. This makes it easy to lift the cake out once it’s baked.
The best part? Parchment paper guarantees a clean release every time. Even sticky batters like caramel or honey-based cakes slide right out. It’s especially helpful for layered cakes, where you need smooth, intact layers.
If you’re wondering how to prevent cakes from sticking to the pan, parchment paper is your best friend. It’s simple, effective, and saves you from the heartbreak of a stuck cake.
Preparing Different Types Of Pans
Bundt Pans: Greasing Every Crevice
Bundt pans are beautiful but tricky. Their intricate designs can turn into a nightmare if the cake sticks. I’ve learned the hard way that greasing every single crevice is non-negotiable. I like to use a pastry brush to apply melted butter or a homemade baking spread made of equal parts shortening, oil, and flour. This mix works wonders!
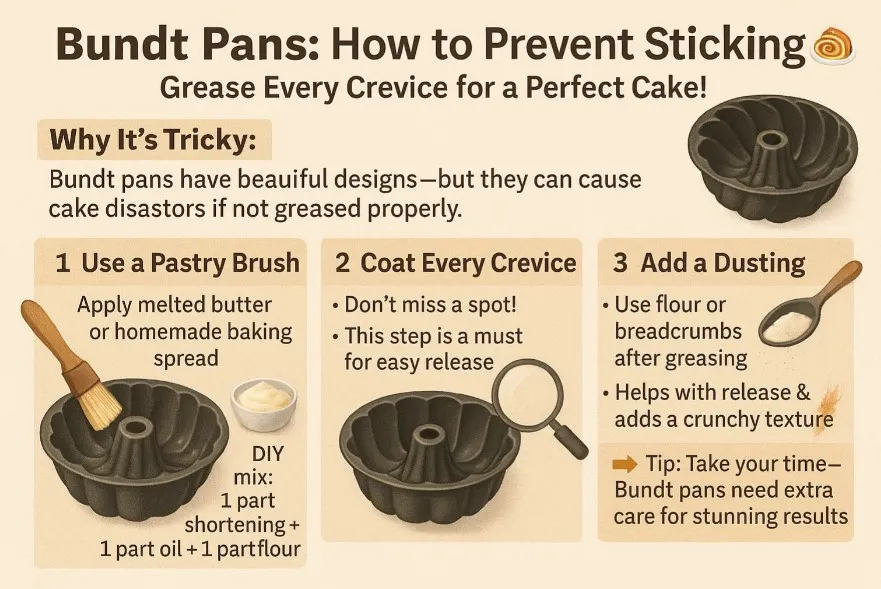
Skipping this step can lead to disaster. Butter alone sometimes separates during baking, causing the cake to stick. Trust me, it’s worth taking the extra time to ensure every nook and cranny is coated. For added insurance, I dust the pan with flour or even breadcrumbs. It not only helps with release but also adds a nice texture to the cake’s exterior.
Tip: Always tap out any excess flour or breadcrumbs to avoid clumps on your cake.
Non-Stick Pans: Do You Still Need To Grease?
Non-stick pans sound like a dream, right? But here’s the truth—they’re not perfect. I always grease them lightly, just to be safe. A quick spray of non-stick cooking spray or a thin layer of oil does the trick.
Even the best non-stick coating can wear down over time. A little extra preparation ensures your cake slides out smoothly. If you’re baking something with a high sugar content, like a caramel cake, I recommend lining the bottom with parchment paper too. It’s a small step that saves a lot of frustration later.
Glass And Ceramic Pans: Special Considerations
Glass and ceramic pans require a bit more attention. They don’t conduct heat as well as metal pans, so cakes often bake slower. I’ve noticed they’re great for recipes that need gentle, even heat, but you’ll need to adjust your baking time.
Here’s a quick comparison to keep in mind:
| Material | Heat Conduction | Insulation | Baking Implication |
|---|---|---|---|
| Glass | Poor | N/A | Slower baking, longer cooking times, especially for browning. |
| Ceramic | Poor | Great | Holds heat well, ideal for serving warm dishes. |
When using these pans, I always grease them thoroughly and sometimes dust with confectioner’s sugar for a sweet, crispy finish. It’s a little extra effort, but the results are worth it!
Cooling And Removing Cakes Safely
How Long To Let The Cake Cool
Timing is everything when it comes to cooling a cake. I’ve found that letting the cake cool in the pan for about 10-15 minutes works best. If you try to remove it too soon, the cake might crumble because it’s still too soft. On the other hand, leaving it in the pan for too long can cause it to stick as the sugars in the batter harden.
Here’s what I do: Once the cake is out of the oven, I place the pan on a wire rack. This allows air to circulate underneath, helping the cake cool evenly. If you’re in a rush, resist the urge to speed up the process by putting the pan in the fridge. Sudden temperature changes can make the cake contract and stick to the pan.
Loosening The Edges Before Removal
Before flipping the cake out, I always loosen the edges. This step is crucial, especially if you skipped parchment paper. I use a thin, flexible knife or an offset spatula to gently run around the edges of the pan. Be careful not to press too hard—you don’t want to damage the cake’s sides.
For Bundt pans, I give the pan a gentle shake after loosening the edges. This helps release the cake from all those tricky crevices. If you hear a slight “thud,” that’s a good sign the cake has detached from the pan.
Flipping And Removing The Cake Without Damage
Flipping the cake can feel nerve-wracking, but it doesn’t have to be. I place a cooling rack or a flat plate over the top of the pan, then hold them together firmly. With one smooth motion, I flip the pan upside down. If the cake doesn’t slide out immediately, I give the pan a gentle tap or shake.
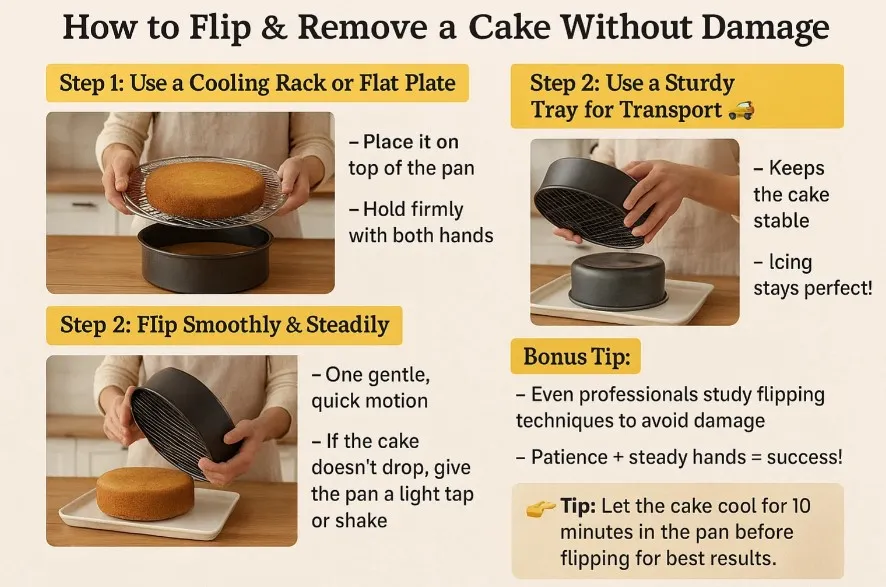
I once transported a cake using a sturdy tray designed for stability, and it worked wonders. The cake stayed intact, and even the icing didn’t budge. This experience taught me the importance of steady handling during flipping and transport.
Interestingly, flipping techniques are also studied in industrial settings to ensure food stays intact. These methods highlight how proper flipping can prevent damage, whether you’re baking at home or working with food professionally.
If you’re still wondering how to prevent cakes from sticking to the pan, these cooling and removal tips will make the process stress-free. With a little patience and care, your cakes will come out perfectly every time.
Troubleshooting Stuck Cakes
Steps To Release A Stuck Cake
We’ve all been there—a cake stubbornly clinging to the pan, refusing to budge. Don’t panic! There are a few tricks I’ve learned that can save the day. First, try running a thin knife or spatula around the edges of the pan. Be gentle to avoid tearing the cake. If that doesn’t work, place a damp kitchen towel under the pan for a few minutes. The steam can help loosen the cake.

Another method I swear by is the “cool and warm” trick. Let the cake cool completely, then warm the bottom of the pan slightly. You can do this by placing it over a bowl of hot water or on a warm stovetop for a few seconds. The heat helps release the cake without damaging it.
If you’re a fan of homemade solutions, consider using a pan release paste, often called “cake goop.” It’s a mix of equal parts flour, vegetable oil, and shortening. Brush it onto the pan before baking, and your cakes will slide out effortlessly. This method has never failed me, even with intricate Bundt pans.
Tip: Always tap the pan gently after flipping. Sometimes, a little patience is all it takes for the cake to release.
Salvaging A Broken Cake
So, your cake broke. It happens to the best of us! Don’t toss it out just yet. There are plenty of ways to turn a baking mishap into a masterpiece. If the cake is only slightly damaged, use frosting as your secret weapon. A thick layer of buttercream can hide cracks and uneven edges.
For more severe breaks, consider making a trifle. Layer the broken cake pieces with whipped cream, pudding, and fresh fruit in a glass dish. It’s delicious and looks fancy enough for any occasion. Another option is cake pops. Crumble the cake, mix it with frosting, roll it into balls, and dip them in melted chocolate. No one will ever know the cake didn’t come out perfectly.
Note: Broken cakes are a great excuse to get creative. Sometimes, the best desserts come from happy accidents.
Preventing Sticking In Future Bakes
The best way to deal with a stuck cake is to prevent it from happening in the first place. Over the years, I’ve developed a foolproof routine. Start by spraying the pan with a nonstick cooking spray that contains flour. It’s a game-changer, especially for intricate pans. Next, cut a piece of parchment paper to fit the bottom of the pan. Lay it flat, then spray the parchment with baking spray for extra insurance.
Here’s a quick step-by-step guide:
- Spray the pan with nonstick cooking spray with flour.
- Cut a parchment circle or rectangle to fit the pan’s bottom.
- Place the parchment inside and spray it lightly again.
This method works like magic. I’ve used it for everything from simple round cakes to elaborate Bundt designs. If you’re still wondering how to prevent cakes from sticking to the pan, these steps will give you peace of mind. Trust me, a little preparation goes a long way.
Preventing cakes from sticking to the pan is all about preparation. Greasing, flouring, and using parchment paper are my go-to methods. They’ve never let me down!
Tip: Take your time with these steps. A little effort upfront saves you from frustration later.
Follow these tips, and your cakes will release perfectly every time. 🎂
FAQs For How To Prevent Cakes From Sticking To The Pan?
How do I know if I’ve greased the pan properly?
I always check for an even, glossy layer of grease. If you see dry spots, add more. Don’t forget the edges and corners!
Can I reuse parchment paper for multiple cakes?
Yes, but only if it’s clean and intact. I reuse parchment for simple cakes, but sticky batters might require fresh paper for a smooth release.
What’s the best way to store leftover cake?
I wrap it tightly in plastic wrap or store it in an airtight container. This keeps it moist and fresh for up to three days.
Final Thoughts
Preventing cakes from sticking is all about preparation. Grease well, choose the right pan, and don’t overbake. With these simple steps, you’ll have perfect cakes every time.
“The secret to baking success? Love, butter, and a well-prepared pan.” – Unknown
Happy baking!