
Picture this: It’s a rainy Sunday, you’re halfway through your legendary double-chocolate-chip recipe, and you’ve already started dancing to your ‘Baking Groove’ playlist. The timer dings, and… every single cookie is singed. Sound familiar? Having torched my fair share, I’ve gathered the most offbeat and effective tactics for sidestepping the dreaded burnt-cookie fate.
Why Cookie Sheets Matter: A Battle of Pans
I’ll admit it—I once splurged on a dark, nonstick baking sheet, thinking it would take my cookie baking to the next level. It looked sleek and promised easy cleanup. But the first batch? Disaster. Those cookies came out blacker than my Monday mood, burnt on the bottom and barely baked on top. I learned the hard way that not all baking sheets are created equal, especially when your goal is to prevent burnt cookies.
Turns out, the type of pan you use can make or break your cookies. Baking experts consistently recommend light pans—think dull-aluminum or stainless steel—because they reflect heat instead of absorbing it. This means your cookies bake more evenly, with golden bottoms and perfectly set tops. On the other hand, dark pans are notorious for absorbing extra heat. The result? Scorched bottoms while the tops remain pale and underdone.
If you’re like me and already own a dark pan, don’t panic. There’s a simple trick: double up. Just slide another baking sheet underneath your dark pan. This buffers the direct heat and gives your cookies a fighting chance. Research shows that doubling pans or using an insulating layer can make a noticeable difference in your cookie baking results.
It’s easy to overlook the impact of pan color and material when you’re focused on recipes and ingredients. But as Stella Parks wisely said:
The color and material of your baking sheet can make or break your cookies.”
To help you see the differences at a glance, here’s a quick comparison of common baking sheets and their typical results:
| Type | Result |
|---|---|
| Dark Pan | Increased risk of burnt bottoms |
| Light Pan | Even baking, better for cookies |
| Shiny Sheet | Reflected heat, less burning |
| Double Pan | Insulated, prevents burning |
So, next time you’re prepping for a round of cookie baking, take a second look at your baking sheets. A simple swap—or a quick double-up—might be all it takes to prevent burnt cookies and get that perfect batch.
The Unsung Heroes: Liners, Mats, and Insulation Tricks
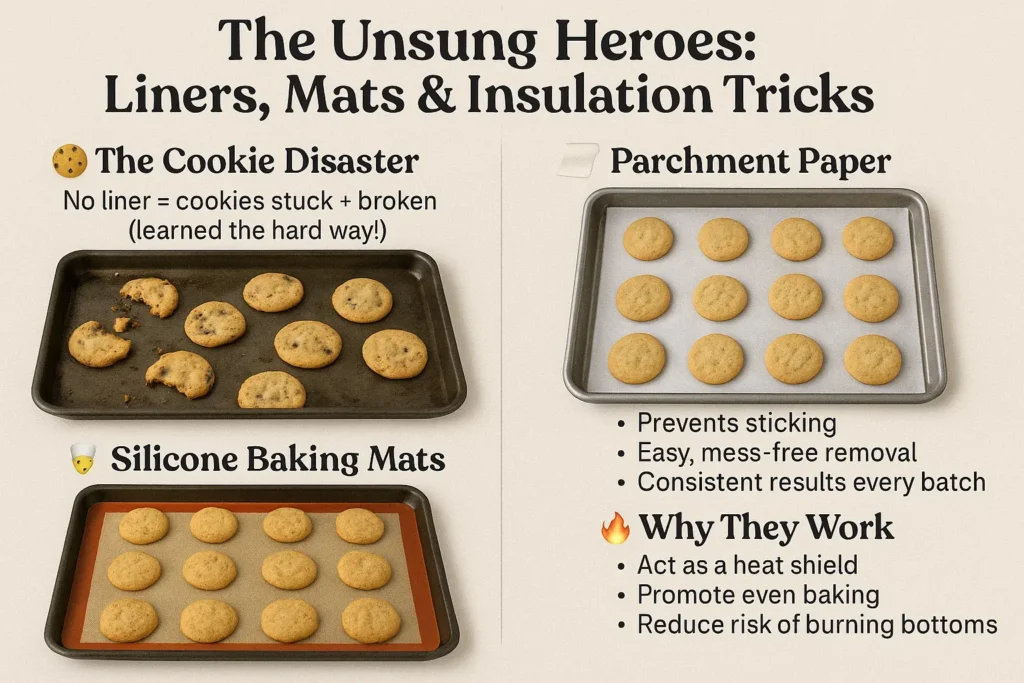
I’ll admit it—my first baking disaster was a classic. I forgot to grease the baking sheet, and half my cookies clung to the pan like barnacles. Wrestling them off with a spatula, I learned the hard way that skipping liners is a shortcut to cookie heartbreak. If you’re looking for reliable Baking Techniques and Cookie Troubleshooting, it all starts with the right liner.
Research shows that using Parchment Paper or a Silicone Baking Mat does more than just prevent sticking. These tools act as a barrier, shielding your cookies from the direct, sometimes harsh, heat of the baking sheet. This means less risk of burning and more evenly baked treats. Parchment paper is especially popular for its mess-free removal and consistent results. If you bake often, silicone mats are a reusable, durable investment that offers extra anti-burn protection. As Erin Jeanne McDowell puts it:
‘A silicone baking mat is a baker’s insurance policy.’ – Erin Jeanne McDowell
But liners aren’t the only trick up my sleeve. Here’s a simple home hack: place an extra (empty) baking sheet directly under your active cookie tray. This extra layer acts as insulation, buffering your cookies from the fierce heat radiating from the oven base. It’s a subtle move, but it can make the difference between golden-brown perfection and a tray of burnt bottoms.
Let’s break down the most common liners and how they impact your cookies:
| Liner | Effect on Baking |
|---|---|
| Parchment Paper | Prevents sticking, promotes even browning |
| Silicone Baking Mat | Extra protection, ensures even baking |
| Greased Foil | Can prevent sticking, but less heat insulation |
| No Liner | Risk of burning and sticking increases |
Not greasing or lining your baking sheet can lead to sticking, uneven baking, or even burning. For the best Baking Tips, always choose the liner that fits your needs. Whether it’s parchment for easy cleanup or a silicone mat for long-term use, these unsung heroes can save your cookies—and your sanity—every time.
Temperature, Timing, and the Human Factor: Trusting Your Senses
Let me start with a confession: I once tried to bake three batches of cookies at once. I got distracted, lost track of the baking time, and the next thing I knew, the smoke alarm was blaring. My dog bolted under the table, and I was left waving a towel at the ceiling. It’s a classic case of what happens when you don’t pay attention to the basics of baking temperature and timing.
Getting the baking temperature right is crucial if you want to prevent burnt cookies. Most cookies do best at 325–350°F (160–177°C). If your oven runs hot, cookies can burn before the centers are done. If it’s too cool, you’ll end up with pale, undercooked cookies that just don’t taste right. Research shows that using an oven thermometer can reveal the real temperature inside your oven—sometimes it’s not what the dial says. I learned this the hard way, and now I always double-check.
Another key baking technique is rotating your pans halfway through the baking time. Ovens often have hot spots, and rotating the cookie sheets helps ensure even baking. I used to ignore this advice, but after seeing a batch with half the cookies burnt and the others barely golden, I changed my ways. It’s a simple step that makes a big difference.
Timers are helpful, but they’re not the only tool you should trust. Sometimes, your senses are the best guide. The smell of cookies just as they hit that sweet spot is unmistakable. As Dorie Greenspan says:
‘Cookies are ready when they smell done—don’t just rely on the clock.’
Visually, look for golden-brown edges. That’s usually the sign it’s time to pull them out. If you wait until the tops are fully browned, they’ll likely be overdone by the time they cool. I’ve found that checking for color and aroma works better than any timer, especially if you’re using a new recipe or a different oven.
- Monitor baking temperature and baking time closely.
- Rotate baking sheets for even baking.
- Trust your nose and eyes—golden-brown edges and a delicious smell mean your cookies are ready.
Paying attention to these details is the best way to prevent burnt cookies and get perfect results every time.
Burning Out Old Habits and Finding Cookie Nirvana
After spending so much time in the kitchen, I’ve realized that Cookie Baking is as much about mindset as it is about method. All the Baking Tips in the world can’t save a batch if I’m stuck in old habits—like using that same dark, warped cookie sheet or ignoring the timer because I “know better.” But research shows that a simple shift, like investing in a lighter-colored or shiny baking sheet, can make a world of difference. It’s not just about the tools, though. It’s about how I use them.
Choosing the right liners, like parchment paper or silicone baking mats, has saved more cookies than I care to admit. These little changes help Prevent Burnt Cookies and make cleanup a breeze. I’ve also learned to trust my senses—watching for that golden brown edge, listening for the faint sizzle, and even catching a whiff of caramelization before it tips into “burnt.” There’s a kind of Cookie Troubleshooting that only comes from experience, and honestly, from a few bake fails along the way.
I started recording my own baking mishaps, partly for a laugh and partly to learn. Sometimes, the cookies that looked the worst ended up tasting the best—crispy edges, gooey centers, and a little extra “character.” It made me wonder: what if life were like cookies? Maybe a little burn just adds flavor, a reminder that perfection isn’t always the goal. Embracing imperfection in the kitchen has made baking more fun and less stressful. I experiment more, worry less, and enjoy the process.
Cooling techniques matter too. Letting cookies rest on a rack after baking helps them set up right, keeping that perfect texture and structure. It’s a small step, but it’s one more way to Prevent Burnt Cookies and get consistent results.
So, if you’re looking for Cookie Baking success, remember: a good baking sheet, the right liner, and a willingness to experiment are your best friends. And if you do burn a batch? Take Julia Child’s advice to heart:
‘Failure is only the chance to bake better next time.’ – Julia Child
In the end, every “fail” is just another step toward your own cookie nirvana.
Quick Troubleshooting: Your Burning Questions Answered
Why do only some of my cookies burn?
This is almost certainly a sign of a cheap, thin pan that has warped and has hot spots. It could also be from overcrowding the pan, which doesn’t allow for proper heat circulation.
My cookies are burnt on the bottom but raw on top!
This is a classic sign of an oven that is too hot at the bottom or a pan that is too dark. Try lowering your oven temperature by 25°F and using a light-colored pan with a parchment paper liner.
What if I only have dark cookie sheets?
Don’t despair! You can still make them work. The fix is simple: lower your oven temperature by 25°F. So, if the recipe says 350°F, bake at 325°F instead. Also, be sure to use parchment paper and keep a close eye on the baking time, as they may be done a minute or two sooner.
Frequently Asked Questions
Can I use wax paper instead of parchment paper?
No, never. Wax paper is not heat-resistant and will smoke and potentially catch fire in the oven. Parchment paper is specially treated for oven use.
How do I clean a burnt cookie sheet?
For messy sheets, make a paste of baking soda and a little water or vinegar. Spread it over the burnt areas, let it sit for 15-30 minutes, then scrub. The gentle abrasion and chemical reaction will lift the burnt bits without damaging your pan.
Should I let my cookie sheet cool between batches?
Yes! This is a vital step. Placing dough onto a hot pan will cause it to spread immediately and likely burn on the bottom before the middle bakes. Always drop your cookie dough onto a cool or room-temperature sheet.
Does the size of the cookie matter for burning?
Absolutely. Smaller cookies bake faster and can go from perfect to burnt in seconds. Larger cookies need more time for the center to cook, so you often need a slightly lower temperature to prevent the edges from burning before the middle is done. Always adjust your time and temp based on the size of your dough balls.
Conclusion: Your Path to Perfect Cookies
Achieving perfectly baked, never-burnt cookies isn’t about finding a secret recipe. It’s about mastering the fundamentals. It’s about choosing the right tool—a light-colored, sturdy cookie sheet—and using it wisely with the help of parchment paper. It’s about knowing your oven’s true temperature and trusting your eyes more than a timer.
These cookie sheet saviors are your reliable guide to dodge burned cookies every time. They are simple, effective steps that build confidence in the kitchen. Remember, baking is a practice of patience and attention. As chef and cookbook author Ina Garten puts it, “I think you have to have a sense of humor about cooking. You can’t be too serious, or you won’t have any fun. And if you don’t have fun, what’s the point?”
So, grab your favorite sheet, line it with parchment, and get ready to pull out a batch of beautifully golden, chewy, and perfectly baked cookies. You’ve got this