

Finding coffee grounds in your Keurig cup can ruin an otherwise good cup of coffee. You may notice fine brown particles floating on top, gritty coffee at the bottom, or larger pieces of coffee grounds in your mug. It can happen with regular K-Cup pods or a reusable coffee filter.
The good news is that you may not need a new coffee maker. In many cases, the problem comes from coffee grounds trapped in the entrance or exit needles, a damaged K-Cup pod, or a reusable filter that is not working properly.
In this guide, you will learn why your Keurig puts grounds in your cup and how to fix the problem step by step. You will also learn when to clean the needles, check your reusable filter, and contact Keurig support.
Quick Answer: Why Is My Keurig Putting Grounds in My Coffee?
Your Keurig may put coffee grounds in your cup because the entrance or exit needle is clogged, a K-Cup pod is damaged, or the reusable coffee filter allows small particles to pass through.
Start by removing and cleaning the K-Cup pod holder. Then check both needles for trapped coffee grounds. If you use a reusable My K-Cup filter, check its compatibility, mesh screen, coffee grind size, and fill level.
After cleaning, run two water-only cleansing brews if your model’s instructions recommend them. Test the machine with a fresh, undamaged K-Cup pod.
Why Does My Keurig Have Coffee Grounds in the Cup?
Before cleaning anything, try to identify when the problem happens. This can help you find the actual cause without taking unnecessary steps.
Here are the most common reasons:
| Possible Cause | What You May Notice | What to Check |
|---|---|---|
| Clogged exit needle | Grounds in brewed coffee | Clean the exit needle |
| Dirty entrance needle | Grounds escaping during brewing | Inspect the entrance needle |
| Damaged K-Cup pod | Grounds around the pod holder | Try a fresh pod |
| Reusable filter problem | Grounds appear mainly with reusable coffee | Inspect the mesh and lid |
| Coffee ground too finely | Fine particles in every reusable brew | Try a coarser grind |
| Overfilled coffee filter | Grounds escaping during brewing | Check the MAX fill line |
| Dirty pod holder or funnel | Grounds around the brewing area | Remove and rinse the parts |
One important detail: If you only see a few fine particles when using a reusable mesh filter, the filter may simply allow some coffee fines through. However, a large amount of grounds or repeated grounds from sealed K-Cup pods needs further investigation.
How to Fix Keurig Grounds in Cup: 7 Easy Solutions
Try these solutions in order. Start with cleaning the removable parts before checking the more specific pod and reusable filter problems.
1. Clean the Keurig Exit Needle
A clogged exit needle is one of the first things to check when your Keurig leaves coffee grounds in your cup.
The exit needle is located at the bottom of the K-Cup pod holder. It creates an opening that allows brewed coffee to flow into your mug.
Coffee grounds can collect around this small opening. When that happens, some particles may enter the brewed coffee instead of staying inside the pod.
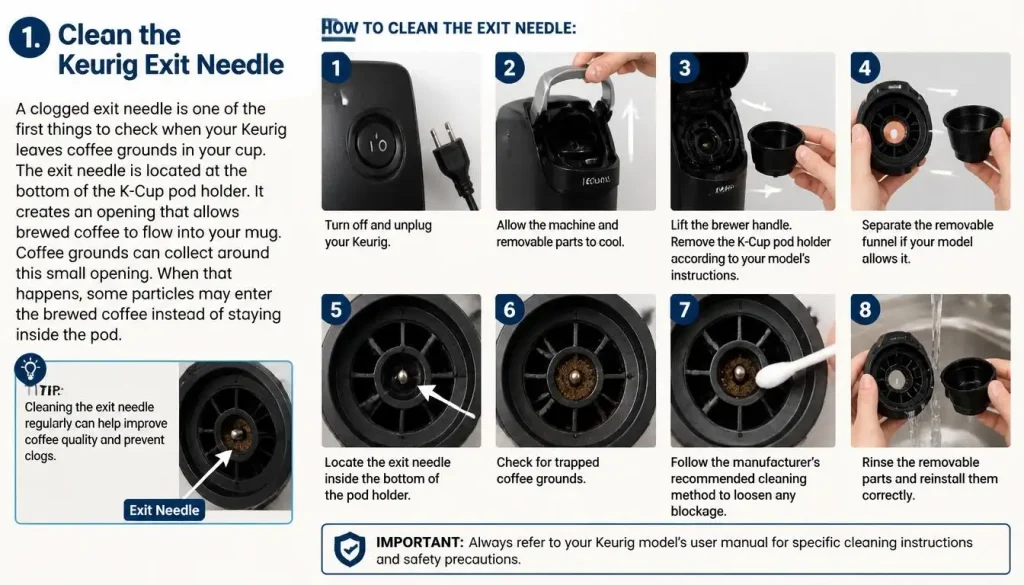
How to clean the exit needle:
- Turn off and unplug your Keurig.
- Allow the machine and removable parts to cool.
- Lift the brewer handle.
- Remove the K-Cup pod holder according to your model’s instructions.
- Separate the removable funnel if your model allows it.
- Locate the exit needle inside the bottom of the pod holder.
- Check for trapped coffee grounds.
- Follow the manufacturer’s recommended cleaning method to loosen any blockage.
- Rinse the removable parts and reinstall them correctly.
Some Keurig use and care guides recommend a straightened paper clip to loosen coffee grounds inside the exit needle.
Important: The needle is sharp. Never put your fingers inside the pod holder. Use a paper clip only when your model’s instructions recommend it, and never force it into the opening.
After cleaning, run a cleansing brew as directed in your user manual.
If you need more help identifying the different parts of your brewer, see our guide on how to clean a Keurig coffee maker.
2. Clean the Keurig Entrance Needle
The entrance needle is different from the exit needle.
It is located underneath the brewer handle and punctures the top of the K-Cup pod. Coffee grounds can collect around its openings, especially when a pod is damaged or coffee escapes during brewing.
A dirty entrance needle may allow old coffee particles to mix with water during a new brewing cycle.
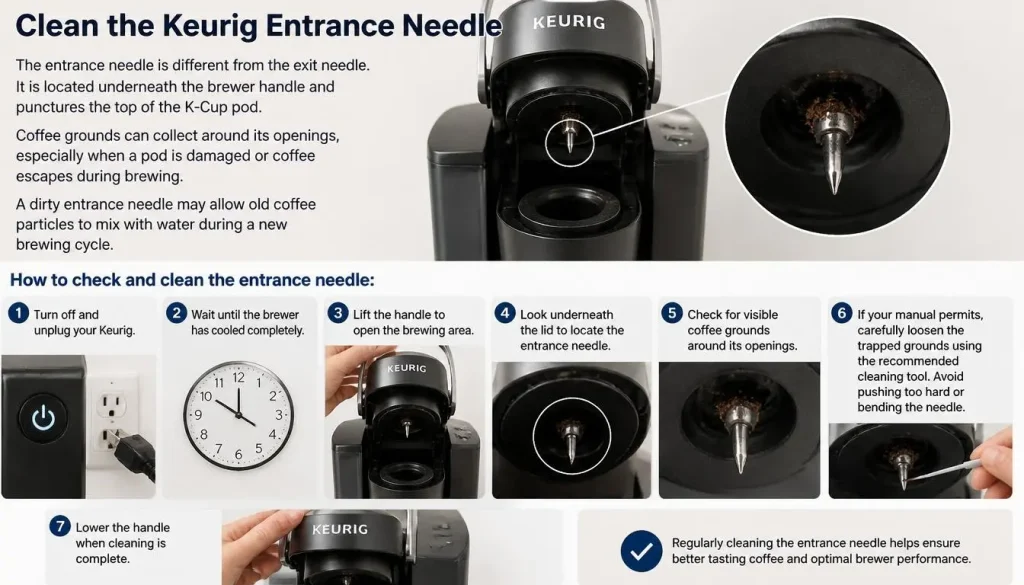
How to check and clean the entrance needle:
- Turn off and unplug your Keurig.
- Wait until the brewer has cooled completely.
- Lift the handle to open the brewing area.
- Look underneath the lid to locate the entrance needle.
- Check for visible coffee grounds around its openings.
- If your manual permits, carefully loosen the trapped grounds using the recommended cleaning tool.
- Avoid pushing too hard or bending the needle.
- Lower the handle when cleaning is complete.
Some Keurig models have more than one needle opening. Follow the exact instructions for your model instead of assuming all brewers have the same design.
Keurig’s official K-Supreme Plus SMART Use & Care Guide explains how to clean the entrance and exit needles and perform cleansing brews afterward.
3. Remove and Clean the K-Cup Pod Holder
Coffee grounds can collect inside the removable pod holder and its funnel.
Even after you change to a new K-Cup, old grounds may remain trapped in these parts. They can then appear in your next cup.
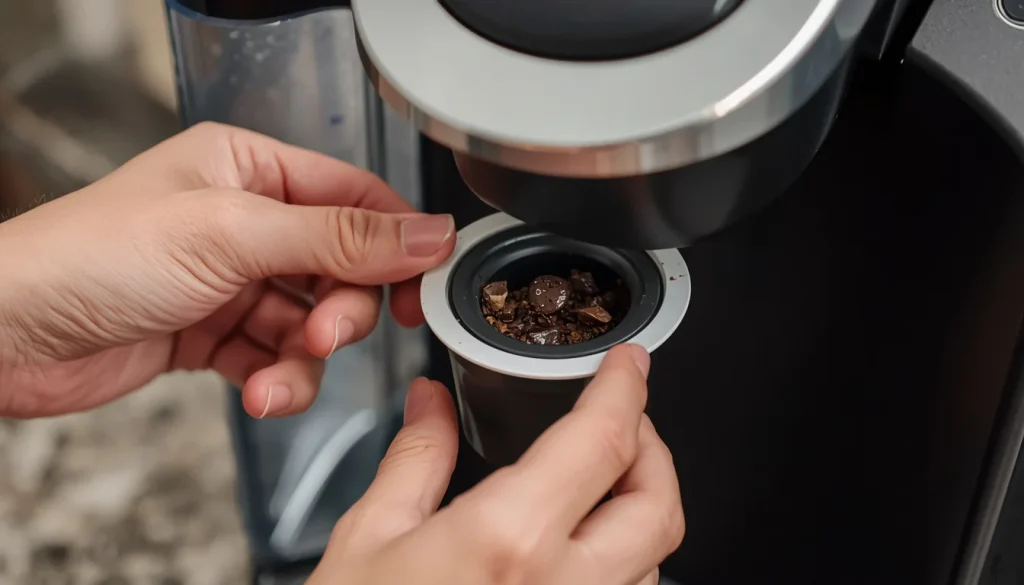
How to clean the pod holder:
- Turn off and unplug the coffee maker.
- Let the hot parts cool.
- Lift the brewer handle.
- Remove the pod holder using the method shown in your user manual.
- Detach the funnel if it is removable.
- Rinse both parts under clean running water.
- Remove visible coffee residue from the surfaces.
- Allow the parts to dry as directed.
- Reinstall the holder and make sure it sits correctly.
Check the funnel and pod holder for cracks or loose parts. A damaged component may need replacement.
Never put your fingers near the sharp piercing needles while cleaning.
4. Check Your K-Cup Pod for Damage
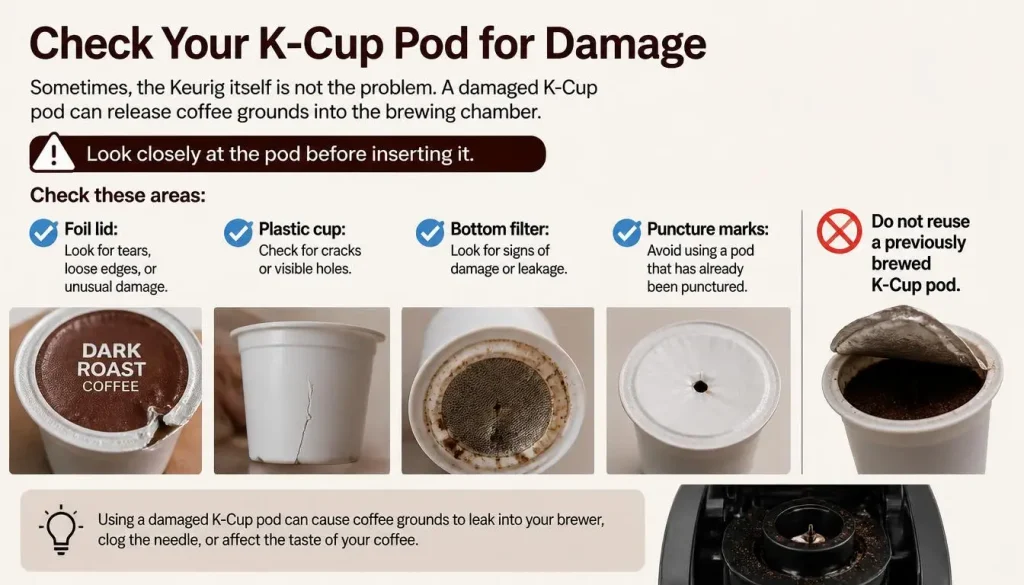
Sometimes, the Keurig itself is not the problem. A damaged K-Cup pod can release coffee grounds into the brewing chamber.
Look closely at the pod before inserting it.
Check these areas:
- Foil lid: Look for tears, loose edges, or unusual damage.
- Plastic cup: Check for cracks or visible holes.
- Bottom filter: Look for signs of damage or leakage.
- Puncture marks: Avoid using a pod that has already been punctured.
Do not reuse a previously brewed K-Cup pod. Its existing holes can allow coffee grounds to escape during another brewing cycle.
Try this simple test:
- Remove the used pod and throw it away.
- Clean any visible coffee grounds around the pod holder.
- Take a new, sealed K-Cup pod from another package.
- Place it correctly inside the holder.
- Close the handle completely.
- Brew a cup and check the result.
If the new pod produces clean coffee, the original pod may have been damaged.
However, if several fresh pods produce the same problem, inspect the entrance and exit needles again.
5. Check Your Reusable My K-Cup Coffee Filter
Do you use a reusable My K-Cup filter instead of disposable pods?
If the grounds appear only when using the reusable filter, focus on the filter itself.
Reusable coffee filters contain small mesh openings. Fine coffee particles may pass through the mesh and reach your cup.
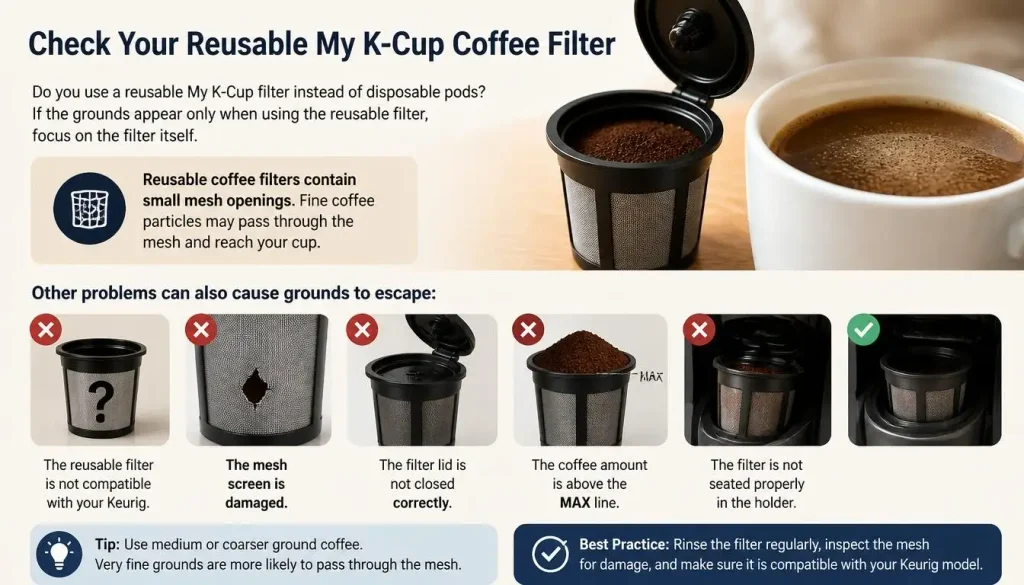
Other problems can also cause grounds to escape:
- The reusable filter is not compatible with your Keurig.
- The mesh screen is damaged.
- The filter lid is not closed correctly.
- The coffee amount is above the MAX line.
- The filter is not seated properly in the holder.
How to check your reusable filter:
- Remove the reusable filter after the machine has cooled.
- Empty the used coffee grounds.
- Rinse the mesh screen and lid.
- Check for holes, cracks, or loose mesh.
- Make sure the lid closes securely.
- Check that your filter is designed for your exact Keurig model.
- Reinstall it according to the manufacturer’s instructions.
Keurig makes different reusable filter designs for different brewers. Older My K-Cup filters may not work with some newer models.
You can check the official Keurig My K-Cup reusable coffee filter information before buying a replacement.
Do not assume that every reusable filter sold online is compatible with your brewer.
6. Use the Correct Coffee Grind Size and Amount
If you fill your reusable My K-Cup filter with your own ground coffee, the grind size can make a difference.
Coffee that is ground too finely may pass through the mesh more easily. Very fine grounds can also collect around the filter screen and affect water flow.
For example, espresso-fine coffee is usually not a good starting point for many reusable Keurig filters.
Try these adjustments:
- Use a medium-coarse grind suitable for your reusable filter.
- Avoid extremely fine espresso powder.
- Keep the coffee below the MAX fill line.
- Do not press or pack the grounds tightly.
- Clean the mesh screen after each use.
The original My K-Cup 2.0 instructions for K200 Series brewers recommend starting with a coarser grind similar to a French press and avoiding a fine espresso grind. They also instruct users not to fill beyond the MAX indicator.
You can read the official My K-Cup 2.0 instruction sheet for the K200 Series.
Remember that fill limits and filter instructions can vary by model.
7. Run Two Water-Only Cleansing Brews
After cleaning the needles and pod holder, do not immediately insert another coffee pod.
Old coffee grounds may still be inside the brewing pathway. A cleansing brew can help flush out loose residue.
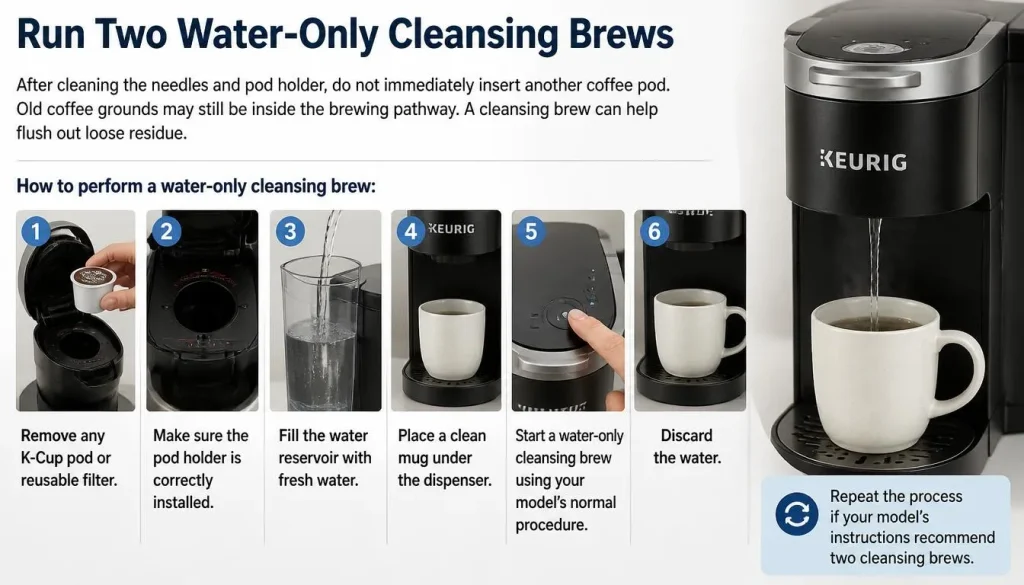
How to perform a water-only cleansing brew:
- Remove any K-Cup pod or reusable filter.
- Make sure the pod holder is correctly installed.
- Fill the water reservoir with fresh water.
- Place a clean mug under the dispenser.
- Start a water-only cleansing brew using your model’s normal procedure.
- Discard the water.
- Repeat the process if your model’s instructions recommend two cleansing brews.
Keurig’s troubleshooting guidance for applicable models recommends cleaning the entrance and exit needles and performing two cleansing brews to help limit coffee grounds in the cup.
Check your model’s instructions before starting the cycles. Some newer brewers use an on-screen cleansing procedure.
Afterward, test the machine with a fresh K-Cup pod.
If the water is clear but coffee grounds return immediately when you use a particular pod, check that pod rather than repeating the cleaning process.
Why Does My Keurig Still Have Grounds in the Cup After Cleaning?
If you have cleaned the needles and pod holder but still see coffee grounds, the problem may be somewhere else.
Here are a few things to check.
The K-Cup pod may be damaged: Try a new pod from another package. If the grounds disappear, the original pod was probably the problem.
The reusable filter may be unsuitable: Check its mesh, lid, and model compatibility. Replace it if the screen is damaged.
The filter may be overfilled: Too much finely ground coffee can increase the amount of particles reaching your cup.
The pod holder may not be installed correctly: Remove it and check that the holder and funnel fit into their proper positions.
The needle may still be blocked: If visible debris remains after cleaning, follow the manufacturer-approved procedure again. Do not force tools into the needle.
If your Keurig also has slow brewing, interrupted brewing, or another performance problem, our guide on Keurig only brewing half a cup may help you investigate that separate issue.
If grounds continue appearing despite these checks, contact Keurig support.
Does Descaling Fix Coffee Grounds in a Keurig?
Usually, descaling is not the first solution for coffee grounds in your cup.
Descaling removes mineral buildup from the internal water system. It is useful when your Keurig has slow brewing, reduced water flow, or a descale warning.
However, it does not repair a damaged K-Cup pod or a broken reusable filter. It also should not replace cleaning the entrance and exit needles when coffee grounds are trapped there.
For this particular problem, start with the following:
- Clean the pod holder.
- Inspect both needles.
- Check the K-Cup or reusable filter.
- Run the recommended water-only cleansing brews.
Descale your brewer when its maintenance schedule or symptoms indicate that mineral buildup is present.
For detailed cleaning and maintenance instructions, visit our complete Keurig cleaning guide.
What If You Have a Keurig K-Duo?
A Keurig K-Duo has both a single-serve brewing side and a carafe side. The cause of coffee grounds can depend on which side you are using.
For the single-serve side:
Check the K-Cup pod, pod holder, entrance needle, and exit needle. Use the cleaning procedure for your particular K-Duo model.
For the carafe side:
Check the ground coffee basket and paper filter.
Make sure the paper filter is fitted correctly and that you are not adding too much coffee. An overloaded basket can cause coffee grounds to escape or the basket to overflow.
Keurig’s K-Duo Gen 2 guide gives a maximum ground coffee capacity for its carafe basket. The exact amount and filter instructions should be checked in the manual for your model.
You can find further details in the official Keurig K-Duo Gen 2 Use & Care Guide.
How to Prevent Coffee Grounds in Your Keurig

Once you fix the problem, a few simple habits can help prevent it from returning.
Clean the pod holder regularly: Rinse the removable parts to prevent old coffee residue from collecting.
Inspect K-Cup pods before use: Avoid damaged, leaking, or previously punctured pods.
Use a compatible reusable filter: Check the manufacturer’s compatibility instructions for your Keurig model.
Choose the right grind size: Avoid very fine coffee when using a reusable mesh filter unless its instructions specifically allow it.
Do not overfill the filter: Stay below the marked MAX line.
Keep the needles clean: Follow the maintenance instructions for your brewer and clean them when grounds build up.
Run cleansing brews when needed: Use the recommended procedure after needle cleaning or when switching from coffee to another type of beverage.
These small steps can help keep your brewer cleaner and reduce unwanted coffee particles.
When Should You Contact Keurig Customer Support?
Most coffee-ground problems start with a pod, filter, or cleaning issue. However, some situations may require professional help.
Contact Keurig support when:
- Coffee grounds continue appearing after proper cleaning.
- The entrance or exit needle looks bent or damaged.
- The pod holder has cracks or broken parts.
- New, undamaged pods repeatedly release grounds.
- The brewer leaks or stops working correctly.
- You notice unusual sounds or other signs of an internal fault.
Do not open the brewer’s internal electrical housing or try to repair sealed components yourself.
You can visit Keurig Customer Support for model-specific troubleshooting, care instructions, and service options.
Frequently Asked Questions
Why Is My Keurig Putting Coffee Grounds in My Cup?
The most common causes include clogged entrance or exit needles, damaged K-Cup pods, and problems with reusable coffee filters. Clean the removable pod holder, check the needles, and test the brewer with a fresh pod.
How Do I Stop Coffee Grounds From Getting Into My Keurig Coffee?
Start by cleaning the pod holder and both needles according to your model’s instructions. Then inspect your K-Cup pods or reusable filter and run the recommended water-only cleansing brews.
Can a Clogged Keurig Needle Cause Grounds in Coffee?
Yes. Keurig identifies trapped coffee grounds in the entrance and exit needles as a possible cause of grounds in brewed coffee. Cleaning these areas can help solve the problem.
Why Does My Reusable K-Cup Let Coffee Grounds Through?
A reusable filter may allow fine coffee particles to pass through its mesh. A damaged screen, incorrect assembly, excessive coffee, or a very fine grind can make the problem worse. Check the filter and use a grind size recommended for that model.
Can a Damaged K-Cup Cause Grounds in My Cup?
Yes. A damaged pod or one that has already been punctured may allow coffee grounds to escape during brewing. Use a new, undamaged pod and dispose of it after brewing.
How Often Should I Clean My Keurig Needles?
There is no single cleaning schedule that applies to every Keurig model. Follow the maintenance instructions for your brewer and clean the needles when coffee grounds or residue build up.
Will Descaling Remove Coffee Grounds From My Keurig?
Descaling removes mineral deposits, not necessarily trapped coffee grounds. If grounds are appearing in your cup, clean the needles and pod holder first. Descale when mineral buildup or your model’s maintenance schedule indicates it is needed.
Is It Normal to Find a Few Coffee Grounds in Keurig Coffee?
A few fine particles may pass through some reusable mesh filters. However, repeated large grounds, noticeable debris from disposable K-Cup pods, or grounds appearing after every brew should be investigated.
Why Are There Coffee Grounds Around My Keurig Pod Holder?
Coffee can escape when a pod is damaged, previously punctured, or not positioned correctly. Trapped grounds may also collect around the holder and funnel. Remove and rinse the holder, then test with a fresh pod.
Should I Replace My Keurig If It Keeps Putting Grounds in My Coffee?
Not immediately. First check the pod holder, entrance and exit needles, disposable pods, and reusable filter. If the problem continues and you suspect a damaged internal component, contact Keurig support before deciding whether replacement is necessary.
Final Thoughts
Finding coffee grounds in your Keurig cup does not always mean your coffee maker is broken. In many cases, the issue comes from a clogged needle, a damaged K-Cup pod, or a reusable filter that needs attention.
Start with the pod holder and entrance and exit needles. Then check your coffee pods or reusable filter. If you use your own ground coffee, pay attention to the grind size and fill level.
Remember to follow the cleaning instructions for your exact Keurig model. If the problem continues after proper cleaning, contact the manufacturer for help.
With the right checks and regular maintenance, you can reduce unwanted coffee grounds and enjoy a cleaner cup of coffee.

“I believe great cooking starts with the right tools, trusted advice, and a little confidence in the kitchen.”
Hi, I’m Emma Carter. My love for cooking began in my grandmother’s kitchen, where I learned that every great meal starts with simple ingredients and the right cookware. Over the years, I’ve spent countless hours researching, testing, and comparing kitchen appliances, cookware, coffee makers, air fryers, and other everyday kitchen essentials.
Here at KiCook, my goal is to make your buying decisions easier with honest product reviews, practical buying guides, and easy-to-follow cooking tips. Whether you’re upgrading your kitchen or searching for the best appliance for your home, I focus on providing clear, reliable, and research-backed information you can trust.
When I’m not testing new kitchen gadgets or writing in-depth guides, you’ll usually find me trying new recipes, visiting local farmers’ markets, or enjoying a quiet cup of coffee while planning my next kitchen project.