

Learning how to fry chicken in an electric skillet is easier than it may seem. The biggest advantage of an electric skillet is temperature control: once the oil is hot, you can keep the heat fairly steady without constantly adjusting a stovetop burner.
For crispy electric skillet fried chicken, preheat the oil to about 350–375°F (175–190°C), cook the chicken in small batches, and use a food thermometer to make sure the thickest part reaches at least 165°F (74°C). Whether you are cooking drumsticks, thighs, breast pieces, wings, or chicken tenders, the same basic method works.
The key is properly seasoned chicken, a dry and well-adhered coating, hot oil, enough room between the pieces, and careful temperature control.
What You Need to Fry Chicken in an Electric Skillet
You do not need complicated ingredients to make good fried chicken. A simple flour coating and a few everyday seasonings can produce a crisp crust and juicy center.
Ingredients
For about 4 servings, you will need:
- 2 to 2½ lb (900 g to 1.1 kg) chicken pieces
- 1½ cups (about 180 g) all-purpose flour or plain flour
- 1 cup (240 ml) buttermilk
- 1 teaspoon salt
- 1 teaspoon paprika
- 1 teaspoon garlic powder
- ½ teaspoon onion powder
- ½ teaspoon black pepper
- ¼ to ½ teaspoon cayenne pepper, optional
- Vegetable, canola, peanut, or another suitable high-heat frying oil
You can use thighs, drumsticks, wings, breast pieces, or a mixture. Similar-sized pieces are easier to cook evenly.
If you do not have buttermilk, regular milk can work. The coating may taste slightly different, but the frying method remains the same.
Equipment
You will also need:
- Electric skillet
- Two shallow bowls
- Kitchen tongs
- Wire cooling rack
- Tray or baking sheet
- Food thermometer
- Deep-fry or oil thermometer, optional but useful
A thermometer is especially helpful if the temperature setting on your appliance seems inaccurate. If the skillet repeatedly runs hotter or cooler than the dial setting, KiCook’s guide on an electric skillet thermostat that may be broken can help you troubleshoot the problem.
What Temperature Should You Fry Chicken in an Electric Skillet?
For most fried chicken, aim to keep the oil around 350°F (175°C). Some methods cook chicken pieces closer to 375°F (190°C).
The USDA notes that hot oil for deep frying is commonly maintained between 350°F and 375°F (about 177–191°C).
A useful starting point is:
| Cooking Stage | Temperature |
|---|---|
| Preheating the oil | 350–375°F / 175–190°C |
| General frying | Around 350°F / 175°C |
| Minimum internal chicken temperature | 165°F / 74°C |
Do not assume that a skillet set to 350°F means the oil is exactly 350°F. Electric skillets cycle their heating elements on and off, and different models can behave differently.
If one side of your chicken burns while another stays pale, the problem may be the appliance rather than your recipe. See this guide to fixing an electric skillet that heats unevenly for possible causes.
What If the Oil Temperature Drops After Adding Chicken?
This is normal. Cold chicken absorbs heat as soon as it enters the skillet.
The mistake is filling the entire pan at once. When too many pieces go into the oil, the temperature can fall quickly. Instead of frying, the coating begins absorbing oil and can become greasy or soft.
For better results:
- Fry in small batches.
- Leave space between every piece.
- Allow the oil to return to the target temperature before starting another batch.
- Adjust the temperature control gradually rather than turning it to maximum heat.
- Check the oil with a frying thermometer when possible.
If slow heat recovery happens every time you use the appliance, it may be worth checking KiCook’s overview of common electric skillet problems and fixes.
How Much Oil Should You Put in an Electric Skillet?
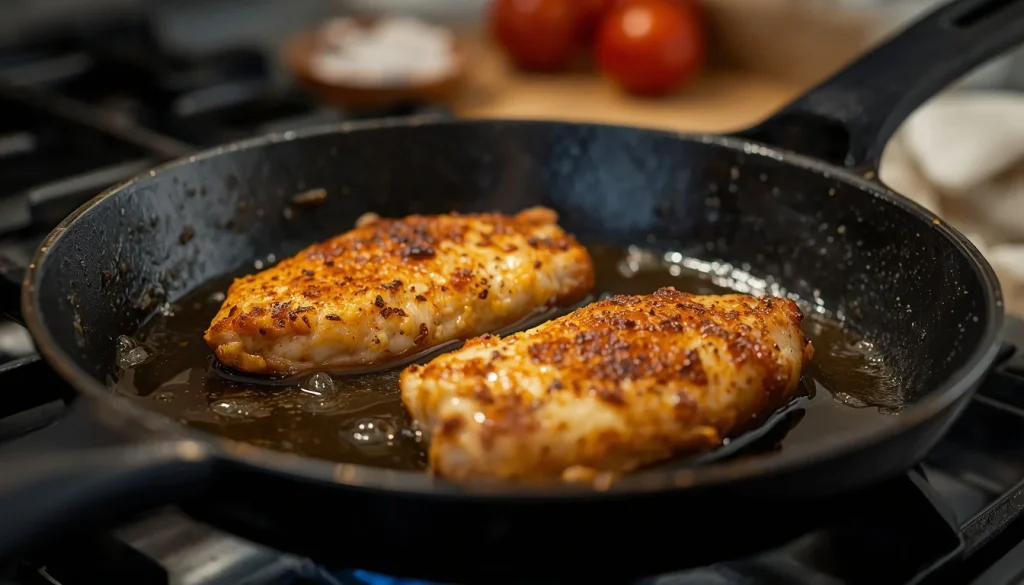
The amount depends on whether you are shallow-frying or using a deeper frying method.
For a typical electric skillet, you can start with enough oil to create a layer approximately ½ inch (1.25 cm) deep. The chicken does not need to be completely submerged for a traditional skillet-fried method.
Larger or deeper skillets may use more oil.
Always check your skillet’s manual before adding a large quantity of oil. Do not fill the appliance so high that bubbling oil can spill over when the chicken is added.
Oil expands and bubbles around wet food, so leaving plenty of space above the oil level is important.
What Is the Best Oil for Electric Skillet Fried Chicken?
Choose an oil that can handle frying temperatures without smoking excessively.
Good choices include:
- Canola oil
- Peanut oil
- Vegetable oil
- Corn oil
- Sunflower oil
- Safflower oil
- Grapeseed oil
The USDA lists several high-smoke-point oils as suitable for deep frying, including peanut, canola, corn, grapeseed, safflower, sunflower, and vegetable oils.
Canola and vegetable oil are good everyday choices because they have mild flavors and are easy to find in the USA, UK, Canada, and Australia.
How to Fry Chicken in an Electric Skillet Step by Step
The process becomes much easier when you prepare everything before turning on the skillet.
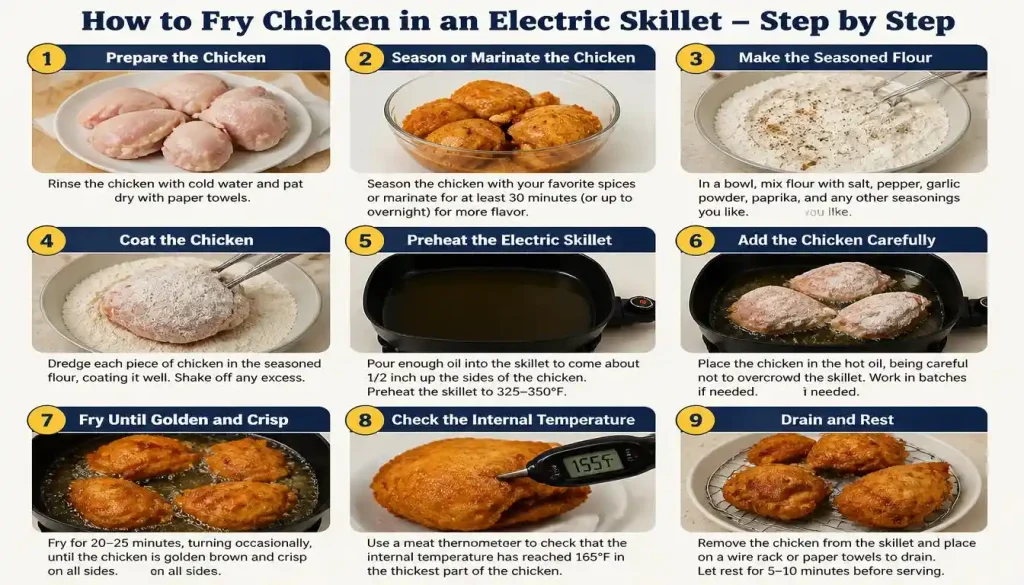
Step 1: Prepare the Chicken
Remove the chicken from its packaging and place it on a clean tray. Pat the surface dry with paper towels.
Do not rinse raw chicken under the tap. The USDA advises against washing raw poultry because splashing water can spread bacteria to nearby surfaces, utensils, and other foods. Proper cooking, rather than rinsing, is what makes chicken safe to eat.
Trim away any large loose pieces of fat or skin if necessary.
If you are using frozen chicken, thaw it before using this breaded frying method. Refrigerator thawing is the easiest option. The USDA also recognizes cold-water and microwave thawing as safe methods when handled correctly.
Step 2: Season or Marinate the Chicken
Place the chicken in a bowl and pour the buttermilk over it.
For more flavor, stir a little salt, pepper, paprika, or hot sauce into the buttermilk.
Cover and refrigerate for at least 30 minutes. For stronger flavor, you can marinate it for several hours.
Keep chicken refrigerated while marinating. Do not leave raw poultry sitting on the kitchen counter for extended periods.
Step 3: Make the Seasoned Flour
In a second shallow bowl, mix:
- Flour
- Salt
- Paprika
- Garlic powder
- Onion powder
- Black pepper
- Cayenne, if using
Taste cannot be adjusted once the coating is fried, so seasoning the flour properly makes a noticeable difference.
Step 4: Coat the Chicken
Lift one chicken piece from the buttermilk and allow the excess liquid to drip away.
Press it firmly into the seasoned flour, turning it until every side is covered.
For a thicker, crunchier crust, use this sequence:
Flour → buttermilk → flour again
Press the final coating onto the chicken rather than simply rolling it around.
Place the coated pieces on a rack or tray and let them sit for about 10–15 minutes while the oil heats.
That short rest gives the flour time to hydrate slightly and helps it stick during frying.
Step 5: Preheat the Electric Skillet
Add your oil, then set the electric skillet to approximately 350°F (175°C).
Allow the oil to heat fully before adding the chicken.
Putting breaded chicken into oil that is still warming is one of the easiest ways to end up with greasy fried chicken.
If you have a frying thermometer, use it to check the actual oil temperature rather than relying completely on the skillet dial.
Step 6: Add the Chicken Carefully
Using tongs, lower each piece into the hot oil away from your body.
Do not drop chicken into the skillet. Hot oil can splash.
Leave some open space around each piece. If your skillet cannot hold all the chicken without crowding, fry it in two or more batches.
Never add water to hot frying oil. The USDA warns that water contacting very hot oil can rapidly turn to steam and cause dangerous splattering.
Step 7: Fry Until Golden and Crisp
Let the first side develop a firm golden crust before turning it.
Avoid constantly moving or flipping the chicken. Frequent handling can loosen the breading.
Turn each piece carefully with tongs and continue cooking until both sides are crisp and golden.
Remember that color alone cannot tell you whether chicken is safely cooked.
Step 8: Check the Internal Temperature
Remove a piece temporarily from the oil and insert a clean food thermometer into the thickest part.
For bone-in pieces, avoid touching the bone with the thermometer probe.
All poultry should reach a minimum internal temperature of 165°F (73.9°C) according to USDA food-safety guidance.
If the chicken has not reached 165°F, carefully return it to the skillet and continue cooking.
Do not depend only on golden color, clear juices, or cooking time.
Step 9: Drain and Rest
Transfer finished chicken to a wire rack placed over a tray.
A wire rack is usually better than piling the chicken directly on paper towels because air can move underneath the crust.
Leave the pieces in a single layer and rest them for about 5 minutes before serving.
If you are frying several batches, keep the finished pieces separated so steam does not soften the crust.
How Long Does Chicken Take to Fry in an Electric Skillet?
Cooking time varies with the size, thickness, temperature, coating, and whether the pieces contain bones.
USDA deep-fat-frying guidance lists approximately 13–20 minutes for chicken pieces at 375°F and 6–8 minutes for chicken fingers at 350°F. These figures are useful references, but an electric skillet used for shallow frying can behave differently.
Use the table below as a practical starting point rather than a guarantee.
| Chicken Cut | Approximate Frying Time | Safe Internal Temperature |
|---|---|---|
| Chicken tenders | 6–8 minutes total | 165°F / 74°C |
| Small wings | About 8–12 minutes | 165°F / 74°C |
| Boneless breast pieces | About 8–12 minutes | 165°F / 74°C |
| Drumsticks | About 13–20 minutes | 165°F / 74°C |
| Bone-in thighs | About 13–20 minutes | 165°F / 74°C |
| Large bone-in breast pieces | About 15–20+ minutes | 165°F / 74°C |
Thick pieces can take longer.
The safest rule is simple: the clock tells you when to start checking; the thermometer tells you when the chicken is done.
Bone-In vs Boneless Chicken: Which Is Better?
Both work in an electric skillet.
Bone-In Chicken
Bone-in thighs and drumsticks are excellent choices when you want juicy fried chicken. They are forgiving and usually stay moist during the longer cooking time.
The downside is that thick bone-in pieces take longer to cook through.
Boneless Chicken
Boneless chicken breasts and tenders cook more quickly, which makes them convenient for a fast meal.
They also overcook more easily. Watch the temperature carefully, particularly with thin breast meat.
If you are new to electric skillet fried chicken, evenly sized boneless strips or medium-size drumsticks are relatively easy to manage.
Should You Cover Chicken While Frying in an Electric Skillet?
For a crisp crust, keep the skillet uncovered during most of the frying process.
Covering hot fried chicken traps steam. Steam softens the flour coating, which works against the crispy texture most people want.
Some traditional skillet-fried chicken methods briefly cover thick bone-in pieces to help them cook through, then remove the lid to restore crispness. This can work, but it requires careful heat control.
For a straightforward crispy fried chicken method, cooking uncovered and checking the center with a thermometer is simpler.
How to Make Electric Skillet Fried Chicken Extra Crispy
Crispy chicken is more about technique than adding extra flour.
Dry the Surface First
Too much surface moisture makes it harder for breading to grip the chicken.
Season the Flour
A crispy crust should taste good on its own. Salt, paprika, garlic, pepper, and onion powder are an easy starting point.
Let the Coating Rest
Once breaded, allow the chicken to sit for 10–15 minutes before frying.
This helps reduce loose flour falling into the oil.
Heat the Oil Before Adding Chicken
Oil that is not hot enough encourages the breading to absorb fat.
Do Not Overcrowd the Skillet
Too much cold chicken causes a major temperature drop.
Turn the Chicken Gently
Wait until the first side has formed a crust before turning it.
Drain on a Wire Rack
Stacking hot chicken traps steam between pieces. A rack keeps air moving around the crust.
Keep Finished Batches Warm
If you are cooking for several people, place finished chicken on a wire rack in a low oven while the next batch fries.
Do not tightly cover it with foil because trapped steam can soften the coating.
Common Electric Skillet Fried Chicken Problems and Fixes
Even a simple fried chicken recipe can go wrong when oil temperature or moisture gets out of balance.
Why Is My Fried Chicken Soggy?
The most common cause is oil that is too cool.
It can also happen when:
- The skillet is overcrowded.
- Chicken goes into the oil before it is fully heated.
- The coating is very wet.
- Fried pieces are stacked while hot.
- Chicken is covered immediately after frying.
Cook smaller batches and allow the oil to recover between them.
Why Is My Chicken Brown Outside but Raw Inside?
Your oil is probably too hot, or your chicken pieces are especially thick.
The crust is browning faster than heat can travel into the center.
Reduce the heat slightly and continue cooking until the internal temperature reaches 165°F.
If your skillet regularly burns food even when the temperature setting appears correct, check whether the electric skillet thermostat is working properly.
Why Does the Breading Fall Off?
Common causes include:
- Chicken was too wet before breading.
- Excess buttermilk was not drained.
- The breading did not rest before frying.
- Chicken was moved too soon.
- Pieces were flipped repeatedly.
Press the flour onto the chicken firmly and give the coating time to set before placing it in the oil.
Why Is My Fried Chicken Greasy?
Oil that is too cool is usually the problem.
When frying temperature falls too far, the crust absorbs more oil before it can become crisp.
Use smaller batches and monitor the heat.
Why Is My Fried Chicken Dry?
Chicken becomes dry when it cooks longer than necessary.
This is particularly common with boneless breast meat.
Start checking thinner pieces early and remove each piece when it has reached a safe temperature rather than waiting for every piece to finish at the same time.
Why Is One Side Cooking Faster?
Your electric skillet may have a hot spot or uneven heating.
First, make sure the chicken pieces are not crowded. If the problem continues even with an empty or lightly loaded skillet, read KiCook’s guide to electric skillet uneven heating and simple fixes.
Can You Fry Chicken in a Nonstick Electric Skillet?
Yes, provided the cooking surface is in good condition and the manufacturer’s instructions allow frying.
Inspect the coating before you begin.
If the nonstick surface is severely damaged, bubbling, or peeling, continuing to cook on it is not a good idea. KiCook has a separate guide explaining what to do when an electric skillet’s nonstick coating is peeling.
Use silicone, nylon, or suitable tongs rather than scratching the surface with sharp metal utensils.
Can You Fry Frozen Chicken in an Electric Skillet?
For this flour-coated fried chicken recipe, thaw the chicken first.
Frozen chicken can carry ice crystals and excess surface moisture. Water and hot frying oil are a dangerous combination because the moisture can cause aggressive splattering.
Thawed chicken is also easier to coat evenly and easier to cook consistently.
The USDA recommends thawing chicken in the refrigerator, cold water, or microwave rather than leaving it on a kitchen counter.
After thawing, pat the chicken dry before seasoning and breading it.
How to Store and Reheat Electric Skillet Fried Chicken
Allow leftovers to cool enough to handle, then refrigerate them promptly in a shallow covered container.
USDA food-safety guidance recommends refrigerating perishable leftovers within 2 hours, or within 1 hour when the surrounding temperature is above 90°F (32°C). Most cooked leftovers should be used within 3–4 days.
Best Way to Reheat Fried Chicken
An oven or air fryer usually restores the crust better than a microwave.
For oven reheating:
- Preheat the oven to about 375°F (190°C).
- Place chicken on a wire rack over a baking tray.
- Heat until hot throughout.
- Check that reheated leftovers reach 165°F (74°C).
The microwave is quicker, but it can make breading soft.
FAQs About Frying Chicken in an Electric Skillet
What temperature do you fry chicken in an electric skillet?
About 350°F (175°C) is a good target for most electric skillet fried chicken. Depending on the method, the oil may be heated as high as 375°F (190°C).
Can you fry chicken at 350°F in an electric skillet?
Yes. 350°F is a common frying temperature and works particularly well when you maintain it consistently.
How long do you fry chicken at 350°F?
Thin boneless pieces may cook in roughly 6–12 minutes, while thick bone-in chicken can take considerably longer. Always verify doneness with a food thermometer rather than relying on time alone.
How much oil do you need to fry chicken in an electric skillet?
For shallow skillet frying, start with enough oil to form roughly a ½-inch layer. Exact quantity depends on the skillet’s size and shape.
Should you cover an electric skillet while frying chicken?
Usually no if your goal is a crisp crust. An uncovered skillet allows steam to escape.
Can I fry chicken without buttermilk?
Yes. You can use milk, a milk-and-egg mixture, or another suitable wet coating. Buttermilk adds flavor and helps the flour coating stick, but it is not essential.
Can I fry boneless chicken in an electric skillet?
Yes. Boneless breasts, strips, and tenders work well and usually cook faster than large bone-in pieces.
How do I know when fried chicken is done?
Use a food thermometer. The thickest part of the chicken must reach at least 165°F (74°C). USDA guidance recommends checking poultry with a thermometer rather than judging doneness from color alone.
Why isn’t my fried chicken crispy?
Your oil may be too cool, the skillet may be overcrowded, or the finished chicken may be trapping steam. Keep the oil hot, cook in batches, and drain the chicken on a wire rack.
Can I reuse frying oil?
Oil can sometimes be reused if it has not burned or developed an unpleasant smell or flavor. Let it cool completely, strain out crumbs, and store it properly. Discard oil that is unusually dark, foamy, rancid-smelling, or heavily smoked.
Final Tips for Perfect Electric Skillet Fried Chicken
The easiest way to remember how to fry chicken in an electric skillet is to focus on a few basics: start with properly thawed and dried chicken, season both the meat and flour, let the breading rest, heat the oil before frying, and avoid crowding the skillet.
Keep the oil around 350°F (175°C), allow it to recover between batches, and use a thermometer to confirm the chicken has reached at least 165°F (74°C) internally.
Once those fundamentals are right, you do not need complicated tricks. Good temperature control, patient frying, and enough space in the skillet are what turn a simple batch of chicken into pieces that are crisp on the outside and tender inside.

“I believe great cooking starts with the right tools, trusted advice, and a little confidence in the kitchen.”
Hi, I’m Emma Carter. My love for cooking began in my grandmother’s kitchen, where I learned that every great meal starts with simple ingredients and the right cookware. Over the years, I’ve spent countless hours researching, testing, and comparing kitchen appliances, cookware, coffee makers, air fryers, and other everyday kitchen essentials.
Here at KiCook, my goal is to make your buying decisions easier with honest product reviews, practical buying guides, and easy-to-follow cooking tips. Whether you’re upgrading your kitchen or searching for the best appliance for your home, I focus on providing clear, reliable, and research-backed information you can trust.
When I’m not testing new kitchen gadgets or writing in-depth guides, you’ll usually find me trying new recipes, visiting local farmers’ markets, or enjoying a quiet cup of coffee while planning my next kitchen project.